
Sunday, September 21, 2008
Slow Cooker Apple Butter

"Ma & Pa", my partner's grandparents, have made homemade apple butter for years, and it's my favorite. Their specialty is making very large batches in an old copper cauldron over an open fire using a wooden paddle to stir (and stir, and stir, and stir) the apples until thick & caramelized. While it's fun to make apple butter that way, it's also an enormous ordeal. So much so that as they've gotten older they've taken to making smaller batches of apple butter on the stovetop. It's just as delicious and so much easier, which suggests to me that good apple butter has more to do with good apples & solid flavorings than a particular cooking technique.
In the spirit of simplifying, I was curious if there was an even easier way to make apple butter. I had picked up a peck of fresh Macintosh apples at Curtis Orchard when I was in Champaign, Illinois, last week with the intention of making apple butter. But then I started reading recipes and they all seemed complex...until I ran across a couple different ones (here and here) that used a slow cooker. Sounded fun & different, so I took those recipes as a starting point and threw in some flavors I like for an urban twist on a country classic.
Ingredients
1 peck cooking apples (most anything besides Granny Smith; I used Macintosh because I am a computer nerd with a sense of humor)
Juice of 2 lemons
5 cups granulated sugar
1 cup vanilla sugar
--or 6 cups granulated sugar
2 tsp ground cinnamon
1/4 tsp ground cardamom
1/4 tsp fresh ground nutmeg
1/4 tsp kosher salt
2" piece vanilla bean, split lengthwise
Peel, core and slice the apples (I use the $20 gizmo shown above to make fast work of this). Toss apple slices in a large bowl with lemon juice. Combine sugar, cinnamon, cardamom, nutmeg, and salt in a medium bowl. Add to apples and toss to coat. Spoon apples & sugar into a large slow cooker and drop the vanilla bean on top. Cover and cook on high 1 hour, stirring occasionally. Reduce heat to low and cook until mixture is bubbly & brown, about 10 hours.
Remove lid and cook for another hour on low heat, allowing water to evaporate and the mixture to thicken. Remove the vanilla bean and scrape the seeds back into the apple butter, stirring well. If you accidentally overcook and it's too thick, just add some apple cider, apple juice, or water to bring to the right consistency. Once cooking is complete spoon the apple butter into prepared half-pint jars and process in a water bath for 5 minutes. Ensure jar is sealed and store in a cool, dark place up to 2 years. Any jars that don't seal should go into the 'fridge for immediate use.
Chris Freeland
cfreeland27@gmail.com
Friday, September 19, 2008
Chicken Pesto Tortellini

This is a dish I make all the time - we probably have some variation on "One Bowl Chicken Pasta" a week. It's simple, quick, and easily improvised based on whatever you have in your pantry or 'fridge. And this week (and for weeks to come) I have our new batch of pesto, so I threw that in for an example of how you can use all those ice cubes of pesto you have sitting in your freezer.
(BTW: This is a great meal for a working couple. You've got 2 large portions to serve for dinner and 2 smaller portions for lunch the next day.)
Ingredients
2 tsp olive oil
2 chicken breasts, cubed
1/2 medium yellow onion, diced
2 cloves garlic, minced
1/4 cup dry red wine
1 can diced tomatoes (or equivalent fresh chopped)
1 T tomato paste
1 cube frozen pesto, or 3 T fresh pesto
1 bag frozen tortellini
After cutting chicken, dry it with paper towels to remove excess moisture. Sprinkle with salt & pepper.
Prepare pan of salted water for boiling frozen tortellini. Begin heating the water to boiling now.
On another burner, heat oil in a heavy skillet (I use my trusty cast iron skillet for this) over medium-high heat. Add chicken and cook 7-10 minutes, stirring until chicken is browned on all sides. Remove chicken to a bowl using a slotted spoon.
Add onion and cook until golden, about 3 minutes. Reduce heat to medium. Add garlic and cook for 1 minute - beware of burning the garlic!
Deglaze the pan by stirring in the red wine, scraping up the browned bits on the bottom of the pan. Cook & stir until smooth, 1-2 minutes. Add the tomatoes and tomato paste, stirring until mixture is well incorporated. Add the chicken & any juices in the bowl back into the sauce.
Bring to a simmer, until tomato sauce is just starting to bubble in several spots, then reduce heat to low. Add the cube of pesto after the sauce has cooled slightly, stirring it in as it melts. Continue cooking on low, stirring occasionally, while you prepare the pasta. Season to taste with salt and pepper.
Cook the frozen tortellini according to package instructions. I prefer the frozen tortellini to the dried kind because it cooks faster - you can use whichever you prefer, or have on hand. Add to a medium sized bowl and toss with a splash of olive oil.
Give the sauce one final stir to make sure the pesto is fully incorporated, then pour onto the pasta. Stir to coat and serve with parmesan cheese.
Tuesday, September 16, 2008
4th Annual (we think) Fest o' Pesto

Several years ago as summer wound down Tagert and I realized that we had each planted far too many basil plants - it was after Labor Day and we still had huge plants covered in leaves. So, we decided to try making several batches of pesto as a way of keeping & storing the excess.
It was a sloppy job & we were woefully short on key ingredients like pine nuts and oil (!!), but the pesto we were able to complete turned out great. We froze the pesto in ice cube trays, which made for easy storage and a convenient serving size to drop into sauces or pasta.
So, the year after that we planted even more sweet basil & got neighbors Rik & Dawn Nemanick into the festivities. Dawn planted & cared for their plants and her husband Rik helped Tagert and I make the pesto. We ended up with tons of pesto that year - so much that everything in my freezer tasted like basil while the pesto was freezing...including the ice cubes!
Then there was the year that I froze everyone's pesto and our refrigerator died before I passed it out. That was a sad, pesto-free year.
Last year we got more organized by, you know, making a list of ingredients and stuff, and buying in bulk. By the time we waded through the pine nuts and oil we still had about 2 plants' worth of basil left to process. We let that go to compost...
I think this year we topped our previous efforts in getting organized and having enough ingredients on hand. Everything went smoothly and we ended up producing more pesto than ever before. Maybe next year we'll get really organized and try to come up with a recipe based on weight of the leaves and process in big batches. But, because we use our own Cuisinart choppers, for now we're kind of limited to smallish batch sizes (5 cups of leaves or smaller).
The other fun thing we've tried the past couple of years is to mix in different ingredients or switch up existing ones. We start off with Ina's basic pesto recipe (as with most Barefoot Contessa recipes it's awesome) and jump off from there - this year Tagert made a sundried tomato pesto that promises to be really tasty, and I swapped out the traditional shredded Parmesan cheese for asiago, which I prefer. We also made small batches with Lemon Basil & Thai Basil, the latter including chopped lemongrass (which I also had in abundance this year).
Regardless of the recipes you try out I think we've found the right approach, which is to do it all in one big, messy day. It's quite an ordeal, what with picking and washing leaves, prepping ingredients, chopping it all up, and trying to neatly spoon the pesto into ice cube trays & plastic containers...but at the end of the day you'll have enough pesto to share with friends and plenty to keep for your use throughout the next year.
One last note - we've realized that making pesto is kinda expensive. The basil is incredibly cheap, but add in pine nuts & walnuts (Ina's recipe calls for both), good olive oil, and Parmesan cheese and you can easily hit $100+ in supplies. But, compared with the outrageously priced containers of herbs in the produce section, your homemade dollop of frozen pesto is a delicious steal.
Ingredients & Instructions
1. Prep basil
- Cut the plants off at the ground.
- Pick off the leaves and put them in a large tub or bin
- Rinse & drain leaves at least twice
- If you have the manpower & an extra container to spare, start one person on the job of drying the basil leaves using a salad spinner (or two). It helps to divide the labor when you're making big batches, as opposed to each person working his or her own batches through from start to finish.
- Toast walnuts & pine nuts.
- Shred parmesan wedges in food processor using the chopping blade. It's noisy, but an incredibly simple, quick way to complete what is normally a slow, painful job!
- Chop garlic.
- We recommend Ina's basic recipe for pesto that she uses in her Pasta, Pesto & Peas. Ina rocks!!
- Substitutions we like:
- Cut the 1 1/2 cup of oil back to 1 cup for a thicker pesto.
- Asiago instead of Parmesan cheese.
- Use lemon basil instead of sweet basil, or add lemon juice & zest to sweet basil.
- Add chopped sundried tomatoes before pureeing leaves.
- ***BUT DON'T DO THESE ALL AT ONCE! Try one, maybe two, substitutions per batch, as the original recipe is really such a classic and you can easily veer off into some odd pestos by mixing up too many flavors.
- Using a spoon, drop pesto into clean, dry ice cube trays.
- Air will turn your lovely green pesto black, so cover each cube with a drizzle of olive oil.
- Wrap trays in plastic wrap.
- Stack and freeze.
- After set, you can either leave them in the trays or pop them out and throw them into a big freezer bag.
- Spoon the pesto into small airtight containers.
- Use these larger portions to make a big batch of pesto pasta.
Friday, September 12, 2008
Homemade Pickles
Let me preface this by saying that I am an amateur canner. No one has died from my canning...yet...
That said, the canning I did this year has turned out remarkably well! The Summer Berry Jam has been a big, big hit with everyone, and my latest batches of dill pickles and other pickled veggies have also been delicious.
I say "latest" batches, but I actually made these about 6 weeks ago when pickling cukes & okra were in abundance at the farmers' markets. That's the part about making pickles that I have a problem with - the waiting for the pickling to occur, for the flavors to develop. I'm kind of an impatient person, and this whole 'delayed gratification' thing you have to accept with homemade pickles is, well, hard to accept.
But it's sooooo worth it! Homemade pickles, whether made from cucumbers, okra, green beans, or other veggies, are really delicious and so much more flavorful (and dare I say 'fun') than store bought. Plus, when you're making your own you can try different spices and seasonings and really come up with something unique...for instance...
Cardamom is my secret weapon in spicing up homemade pickles, specifically green cardamom pods. Cardamom is a small seedpod frequently ground or stewed in Indian and Middle Eastern cuisine, and it adds a really...sultry...flavor to many dishes. (Heck, I even put it in chocolate cake!) You can find cardamom pods in specialty markets; skip the ground, bottled stuff in the spice rack for canning - you want the whole pods.
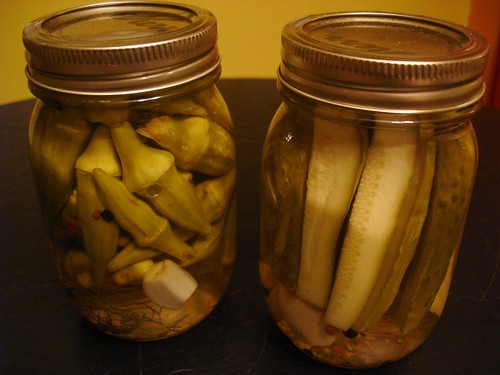
The recipe below can be used on any veg that will stand up to pickling (and that's most, but crunchy green ones are the best). I used the same brine & seasoning to make pickled okra and cucumbers (as you can see in the photo above). I go light on the dill because I like the other flavors, but that's just a personal preference. Again, part of the charm of making your own homemade pickles. Give it a try - you'll become a convert like me!
Ingredients
The brine*
5 tablespoons kosher salt
1/2 cup white wine vinegar
1 teaspoon peppercorns (I use a mix of green, white, red & black)
5 cups water
3 T fresh dill
*This will make enough brine for about 4 pint jars, depending on the veg you use in the pickle.
The pickle
1-2 lbs fresh, washed vegetables (enough to fill the 4 pint jars)
4 cloves of garlic
4 teaspoons peppercorns
4 green cardamom pods, lightly crushed open
1/2 tsp red pepper flakes, divided into 1/8 tsp
4 small heads of dill, totaling about 1/4 cup in all
Prepare your canning jars and lids as instructed by the USDA. Serious stuff here, so really take care to have a clean, sterile environment for your canning.
Cut the vegetables as needed to fit the jars. If you're pickling okra DO NOT cut them open...the gelatinous goop inside that makes gumbo so thick & rich will make your pickles, well, icky.
To make the brine, boil all its ingredients for 3 minutes.
Into each of your hot, prepared jars put 1 clove of garlic, 1 tsp peppercorns, 1 cardamom pod, and 1/8 tsp red pepper flakes. Then add your veggies, then add 1 head of dill, pushing it slightly down into the veggies so that it's not alone by itself at the top of your jar. Using a canning funnel, fill the jar with the brine, leaving 1/2 inch of headspace. Wipe the jar and the rim, place the canning lid & ring, and prepare in a hot water bath for 10 minutes.
Allow flavors to develop for at least 4 weeks before opening. But as soon as that 4th week is over crack one of 'em babies open & crunch away! These are great served as part of a ploughman's plate or cheese spread, or of course just by themselves. They will keep up to a year in a cool, dark place, and up to a month after opening in the 'fridg.
*Brine recipe adapted from one of the most fascinating cookbooks I've read in a long time, Charcuterie: The Craft of Salting, Smoking, and Curing by Michael Ruhlman (Author), Brian Polcyn (Author), Thomas Keller (Foreword).
That said, the canning I did this year has turned out remarkably well! The Summer Berry Jam has been a big, big hit with everyone, and my latest batches of dill pickles and other pickled veggies have also been delicious.
I say "latest" batches, but I actually made these about 6 weeks ago when pickling cukes & okra were in abundance at the farmers' markets. That's the part about making pickles that I have a problem with - the waiting for the pickling to occur, for the flavors to develop. I'm kind of an impatient person, and this whole 'delayed gratification' thing you have to accept with homemade pickles is, well, hard to accept.
But it's sooooo worth it! Homemade pickles, whether made from cucumbers, okra, green beans, or other veggies, are really delicious and so much more flavorful (and dare I say 'fun') than store bought. Plus, when you're making your own you can try different spices and seasonings and really come up with something unique...for instance...
Cardamom is my secret weapon in spicing up homemade pickles, specifically green cardamom pods. Cardamom is a small seedpod frequently ground or stewed in Indian and Middle Eastern cuisine, and it adds a really...sultry...flavor to many dishes. (Heck, I even put it in chocolate cake!) You can find cardamom pods in specialty markets; skip the ground, bottled stuff in the spice rack for canning - you want the whole pods.
The recipe below can be used on any veg that will stand up to pickling (and that's most, but crunchy green ones are the best). I used the same brine & seasoning to make pickled okra and cucumbers (as you can see in the photo above). I go light on the dill because I like the other flavors, but that's just a personal preference. Again, part of the charm of making your own homemade pickles. Give it a try - you'll become a convert like me!
Ingredients
The brine*
5 tablespoons kosher salt
1/2 cup white wine vinegar
1 teaspoon peppercorns (I use a mix of green, white, red & black)
5 cups water
3 T fresh dill
*This will make enough brine for about 4 pint jars, depending on the veg you use in the pickle.
The pickle
1-2 lbs fresh, washed vegetables (enough to fill the 4 pint jars)
4 cloves of garlic
4 teaspoons peppercorns
4 green cardamom pods, lightly crushed open
1/2 tsp red pepper flakes, divided into 1/8 tsp
4 small heads of dill, totaling about 1/4 cup in all
Prepare your canning jars and lids as instructed by the USDA. Serious stuff here, so really take care to have a clean, sterile environment for your canning.
Cut the vegetables as needed to fit the jars. If you're pickling okra DO NOT cut them open...the gelatinous goop inside that makes gumbo so thick & rich will make your pickles, well, icky.
To make the brine, boil all its ingredients for 3 minutes.
Into each of your hot, prepared jars put 1 clove of garlic, 1 tsp peppercorns, 1 cardamom pod, and 1/8 tsp red pepper flakes. Then add your veggies, then add 1 head of dill, pushing it slightly down into the veggies so that it's not alone by itself at the top of your jar. Using a canning funnel, fill the jar with the brine, leaving 1/2 inch of headspace. Wipe the jar and the rim, place the canning lid & ring, and prepare in a hot water bath for 10 minutes.
Allow flavors to develop for at least 4 weeks before opening. But as soon as that 4th week is over crack one of 'em babies open & crunch away! These are great served as part of a ploughman's plate or cheese spread, or of course just by themselves. They will keep up to a year in a cool, dark place, and up to a month after opening in the 'fridg.
*Brine recipe adapted from one of the most fascinating cookbooks I've read in a long time, Charcuterie: The Craft of Salting, Smoking, and Curing by Michael Ruhlman (Author), Brian Polcyn (Author), Thomas Keller (Foreword).
Subscribe to:
Posts (Atom)