Sunday, December 13, 2009

Hard Rock Candy


Root Beer Rock Candy, originally uploaded by chrisfreeland2002.

Hard candy is incredibly easy to make. There's a basic recipe for the candy itself and you use flavored oils for candy making and food coloring to make each batch unique. You can get the flavored oils at some craft shops or online. You can also use traditional flavored extracts (like vanilla or almond), though the flavor won't be as strong as with the oils.

Ingredients
2 cups white sugar
1 cup water
2/3 cup white syrup
1 t flavored oil
A few drops of food coloring
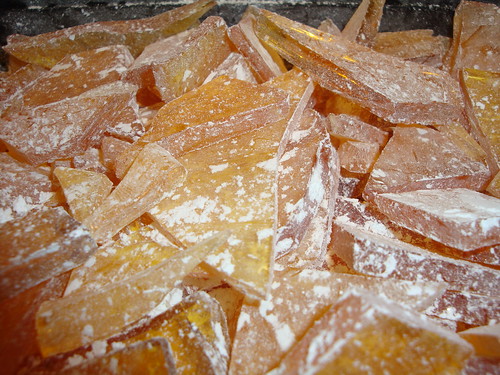
Powdered sugar

Boil sugar, water & syrup in a heavy bottom saucepan to 300 degrees. Use a candy thermometer to ensure proper cooking temperature. At 300 degrees (hard crack stage) add the oil and food coloring and boil until 310 degrees. Pour candy on clean & dry cookie sheet and let cool. Use the handle of a table knife to bust up the candy into small pieces. Drop into powdered sugar and toss well to coat, then sift off flour and store the candy in a ziplock bag or other dry container.

Warning: I know this is one of those "Well, duh" reminders, but DO NOT try to sample the candy while you're pouring it into the pan. It's kind of a cook's habit to dip a finger or spoon in to taste what you're preparing, but you cannot do that when making hard candy. It's like molten lava and will burn you. I know this from experience :-\

Chris

Friday, November 20, 2009

Chicken Sandwich with Fried Green Tomatoes


This is unbelievably good! Crispy chicken combined with the sweet and tart of fried green tomatoes. Amazing!


Components
Chicken Strips/Filets/Patties
Fried Green Tomatoes
Sandwich Bun
Mayonnaise
Shredded Lettuce – optional
Hot Pepper Sauce – optional

Fry the chicken strips according to directions or use your favorite breaded chicken strip recipe. At the same time make the fried green tomatoes. Toast the sandwich bun.

Spread a generous amount of mayonnaise on the top and bottom sandwich bun. To assemble: place one or two chicken strips on the bottom bun, add two fried green tomato slices, garnish with lettuce and several dashes of hot pepper sauce, and finish with the top bun.

Serve immediately.

Makes 1 sandwich

I listed the hot pepper sauce as optional. But, it’s really not. I highly recommend it. You can leave the lettuce off if you want.

Saturday, November 7, 2009

Fried Green Tomatoes


Fried Green Tomatoes are something most people did not know about until the movie with the same name. Even then some probably did not believe it was a real food. Everyone should give them a try. The sweet from the cornmeal and the tart from the green tomato make a great combination.


Ingredients
3 large firm Green Tomatoes
1 cup Cornmeal
½ cup All-Purpose Flour
2 teaspoons Salt
1 teaspoon fresh ground Black Pepper
½ teaspoon cayenne pepper - optional
1 cup Buttermilk – shaken
Vegetable Oil
Hot Pepper Sauce – for serving, optional

Fill FryDaddy with oil to recommended level and heat oil.
Or in a large cast iron skillet add about ½ inch of oil and heat over medium-high heat until hot.

Rinse the green tomatoes, and cut into ½ inch thick slices. Discard end pieces.

It is entirely optional, for a nice even coating peel the tomatoes before slicing. The tomato skin is slick and the mixture does not adhere to it very well.

Pour the buttermilk into a small bowl. Combine cornmeal, flour, salt, pepper, and the optional cayenne pepper if you want it. Dip tomatoes in the buttermilk and then dredge in the cornmeal mixture. Coat the tomatoes well. Gently place in the hot oil. Do not over crowd the slices in the oil. If using a cast iron skillet, fry in a single layer. May want to fry in batches. Fry for about 6 minutes, 3 minutes per side, until golden brown. Carefully remove the tomatoes from oil and transfer to a platter lined with paper towels. Serve immediately with hot pepper sauce.

Makes 5-6 servings


For an extra kick add some hot pepper sauce in the buttermilk before you dip the tomatoes. Can also be served with ranch dip or a sprinkling of parmesan on top.

Saturday, September 12, 2009

Fried Squash


Fried Squash
Originally uploaded by TagDragon

I’m on a little bit of a fried kick, which is fine with me. My friend Christine, who is an excellent cook, seems to think I eat too much brown food? I really didn’t understand what she was saying though? Fried Squash is another classic summer southern food. Fresh out of the garden, golden brown, and delicious.

Ingredients
2 or 3 large Yellow Squash
1 cup All-Purpose Flour
1 cup Cornmeal
2 teaspoons Salt
1 teaspoon fresh ground Black Pepper
1 cup Buttermilk – shaken
Vegetable Oil

Fill FryDaddy with oil to recommended level and heat oil.
Or fill Dutch oven with about 2 inches of oil and heat to 360 degrees F.
Or add ½ inch of oil to a large skillet and heat till very hot.

Combine flour, cornmeal, salt, and pepper in a shallow bowl or dish.

Wash squash, trim ends, and slice into ¼ inch thick rounds. There is no need to peel the squash. It is perfectly alright to use the entire squash, large and small ends.

Dip squash rounds in buttermilk then dredge in flour mixture until evenly coated. It is fine to press on the flour mixture so more adheres to the squash. Gently drop squash in hot oil. Do not over crowd the squash. For a skillet, fry in a single layer. May want to fry in batches. Carefully flip squash after 3-4 minutes to fry evenly. Fry squash for 6-8 minutes until golden brown. With a slotted spoon, remove squash from oil and drain on a plate lined with paper towels. Serve immediately.

Makes 5-6 servings

If your flour mixture starts to run out or clump together add more of the ingredients or make a fresh batch. You can reuse cooking oil for frying more than once. Allow the oil to cool. Strain the oil through a strainer lined with layers of cheesecloth or paper towel. Store oil covered in a cool, dark place. Also, do not keep oil hot longer than necessary. Stop using oil when it gets a dark color, has a rancid smell or changes the taste of the food, or begins to smoke before heated to proper frying temperature.

Monday, September 7, 2009

Roasted Heirloom Tomato Bisque


Here's another simple 'unrecipe.' I got some beautiful heirloom tomatoes at Soulard Market on Saturday and didn't want them to go to waste, so I sliced the tomatoes; sprinkled them with kosher salt, fresh ground pepper, thyme and olive oil; and roasted them in a 400 degree oven until they carmelized, about 45 minutes. Once those were finished I chopped & sautéed a leek, a carrot, and a celery stalk, a few cloves of garlic, and a little bit of poblano pepper until golden, about 10 minutes. I added the roasted tomatoes (and the cooking juices) to the pot and cooked until bubbling, about 5 minutes. I added in about 2 cups of chicken stock and brought the soup to a boil, dropped in a few sprigs of thyme & sage, and reduced to a simmer for about 20 minutes, stirring often. I let the soup cool a bit, then ran it through my new food mill (LOVE it!), then whisked in some cream until it looked about right, and seasoned with salt & pepper. Delicious & simple!

Wednesday, September 2, 2009

Fried Okra


Fried Okra
Originally uploaded by TagDragon

Being from the south, I love all things fried. And fired okra is very near the top of this list. I can recall (and still do) waiting for the okra to be ready and eating it right off the platter before it even reaches the table. And we love our FryDaddy which makes really good fried okra. One pound of okra makes 3 to 4 servings or it makes 1 if you’re me.

Fried Okra is also a nice appetizer. Serve it in the kitchen as folks are waiting on dinner. It’s so fun to nibble on, maybe with a little ranch dip. For fried okra in the winter when you can’t find good fresh okra see the freezing instructions at the end.


Ingredients
1 pound Fresh Okra
1 cup All-Purpose Flour
½ cup Cornmeal
1 tablespoon Salt
½ teaspoon fresh ground Black Pepper
¾ cup Buttermilk – shaken
Vegetable Oil

Fill FryDaddy with oil to recommended level and heat oil.
Or fill Dutch oven with about 2 inches of oil (best if okra can float) and heat to 350 degrees F.
Or add oil to a large heavy-bottomed skillet and heat to very hot. For both the Dutch oven and skillet do not fill over halfway full.

Wash okra whole, remove ends, and cut into ½ inch pieces. Okra will shrink slightly when frying. Place cut okra in a colander over a bowl and pour buttermilk over okra until thoroughly coated. Allow to sit for a minute or two.

Combine flour, cornmeal, salt, and pepper. Toss okra in flour mixture until thoroughly coated. Gently place okra in hot oil. Do not over crowd the okra in the oil. No more then two pieces deep. May want to fry in batches. Do not stir or turn the okra for 4-5 minutes. Carefully turn okra after 4-5 minutes to fry evenly. Fry okra for 8-10 minutes until deep golden brown. With a slotted spoon, remove okra from oil and transfer to a plate lined with paper towels. Serve immediately.

Makes 3-4 servings


If your flour mixture starts to run out or clump together add more of the ingredients or make a fresh batch. You will be able to fry two batches before serving. I recommend using the FryDaddy and then the Dutch oven.

Freezing Instructions:
Follow instructions up until frying. Place the flour mixture coated okra onto a parchment lined baking sheet in a single layer and freeze. After frozen, transfer okra to a freezer bag and keep frozen until ready to use. Fry frozen okra as directed above.

Monday, August 24, 2009

Tapenade with Feta


Tapenade with Feta
Originally uploaded by TagDragon


I’m a big fan of tapenade. As you can see from here. Following is another variation on the traditional tapenade. I think olives and feta are a natural combination and work great together. They both remind me of Greece, even though they are found in many other cultures and types of cuisines. The white flecks of feta are a nice contrast to the dark color of the olives.


Ingredients
½ pound Kalamata or other good black olives – pitted
¼ pound good green olives – pitted*
1 tablespoon Capers - drained
2 cloves Garlic - minced
2/3 cup good Extra-Virgin Olive Oil
2 tablespoons Lemon Juice – freshly squeezed (about 1 small lemon)
2 teaspoons fresh Thyme - chopped
2 teaspoons fresh Oregano – chopped
8 ounces Feta (whole block if you can find it)*
Crackers or toasted sliced Baguette

In a food processor fitted with the steel blade pulse the garlic a few times to thoroughly mince. Add both types of olives and capers and pulse a few times more until very roughly chopped. Add the olive oil, lemon juice, thyme and oregano and process until just combined but still chunky. If you have a whole block of feta, cut feta into small cubes. Add feta to the food processor and pulse a few times more. You want to still be able to see small chucks of the feta in the tapenade.

Serve with crackers or toasted baguette. Makes a large party potion.


*If your market has an olive bar, check to see if it has a Mixed Olive with Feta Salad. Use ¾ pound of the olive feta salad (very heavy on the feta and heavy on the green olives) in place of the ¼ pound green olives and 8 ounces feta. Any oil that comes along with the olive feta salad, use with the extra-virgin olive oil in the tapenade.

I recommend cutting each olive in half before adding them to the food processor to check for missed olive pits. I find one or two pits about every time I buy olives. Also, see the crostini blog post that goes excellently with tapenade.

Saturday, August 1, 2009

Trio of Sour Cream


Trio of Sour Cream
Originally uploaded by TagDragon


I like flights of food and drink where you get multiple small portions of the same item in different flavors. While this trio of sour cream is not a true flight, it is along the same idea. It is a great way to zest up sour cream and if you want to make something a little extra special. Varity is the spice of life. Goes great with Skillet Nachos.


Ingredients

Cilantro Lime Sour Cream
1 cup Sour Cream
2 tablespoons fresh Cilantro – finely chopped
1 tablespoon fresh Lime Juice

Combine all ingredients and thoroughly whisk together. Refrigerate until ready to use. Garnish before serving.


Chipotle Sour Cream
1 cup Sour Cream
2 tablespoons Chipotle Peppers – seeded and finely chopped (2 peppers)
2 tablespoons Adobo Sauce from can

Combine all ingredients and thoroughly whisk together. Refrigerate until ready to use. Garnish before serving. Find Chipotle Pepper in Adobo Sauce in the Mexican food isle.


Herb Sour Cream
1 cup Sour Cream
2 tablespoons fresh Parsley – finely chopped
2 tablespoons fresh Chives – finely chopped
½ teaspoon Salt
¼ teaspoon fresh ground Pepper

Combine all ingredients and thoroughly whisk together. Refrigerate until ready to use. Garnish before serving.


When serving all three sour creams at the same time, garnish each to help people know which is which. Suggestions: a lime wheel on the Cilantro Lime, a whole chipotle pepper on the Chipotle, and chopped chives sprinkled on the Herb.


Sunday, July 26, 2009

Farmstand Asian Slaw


Farmstand Asian Slaw, originally uploaded by chrisfreeland2002.

I was inspired to make this slaw after reading this article in Food & Wine about quick pickles. I like to make pickles & relish, but generally process them in a waterbath; these are faster to make, but more perishable.

The beauty of making relishes like this is you can throw in whatever you have on hand or looks good at the market and then find the appropriate seasoning to mix with the veggies. At the Tower Grove Farmers' Market on Saturday I found really crisp cabbage sprouts, bean sprouts, carrots & red peppers, so I started thinking about an Asian slaw, plus I knew I had garlic, ginger & rice vinegar on hand.

Talk about simple - I washed & chopped all the vegetables into thin strips and placed them in 2 qt jars, and topped them with the Curry Quick Pickles brine recipe. This should keep for a month in the fridge. I tried it out this morning and the flavors are already there - tangy, sweet, salty, & peppery with a satisfying crunch from the fresh veggies.

A more zingy title for this might be "Country Kimchi" but since it doesn't have fermented cabbage it's not reeeeeally kimchi, so I didn't want to offend any purists.

Chris

Friday, July 17, 2009

Skillet Nachos


Skillet Nachos
Originally uploaded by TagDragon

I love nachos. They are one of my favorite foods. Whether as cheese dip, individual single layer chips, or piled high; they’re all good. I also love to grill. So, why not put the two together. Just assemble, heat on the grill, and dig in. These are a great outdoor party appetizer and everyone will rave and ask “why didn’t I think of this?”


Ingredients
1 ½ cups Tomatoes – diced
¾ cup Scallions, white and green parts – sliced
15 ounces Black Beans – rinsed and drained
2 cups finely shredded Sharp Cheddar Cheese
½ teaspoon Cayenne Pepper
½ teaspoon Ancho Chile Pepper
3 fresh Jalapeno Peppers - sliced
Assorted White, Yellow, and Blue Tortilla Chips
1 cup Sour Cream

Preheat outdoor grill to Medium heat.

Combine the cheddar cheese, cayenne pepper, and ancho chile pepper in a small bowl and mix together. In a large cast iron skillet, 10 inches or larger, arrange a layer of assorted chips and top with 1/3 of each the tomatoes, scallions, black beans, cheddar cheese, and jalapeno peppers. Repeat with two more layers of chips and toppings. You may want to build a kind of “chip wall” around the outside edge of the skillet to keep toppings from tumbling off the sides.

Place skillet on grill and heat for 10 – 12 minutes with the lid closed.

Serve with sour cream. Makes 6 appetizer potions.


Feel free to adjust the heat with more or less cayenne and ancho chile pepper; more sliced jalapeno; or seeded jalapeno. Pickled jalapenos work just fine too. Don’t be worried if the outside edges of some of the chips get brown and burnt. It just adds to the flavor and experience of Skillet Nachos.


Friday, July 10, 2009

Maque choux


Maque choux, originally uploaded by chrisfreeland2002.

Here's another unrecipe for this simple & delicious Cajun staple:

Chop: 1/2 lb bacon, 1 medium yellow onion, 1 red bell pepper, 2 cloves of garlic, 1/2 jalapeño pepper (seeded), 1 bunch parsley

Grill: 2 ears of sweet corn, husks removed to grill. Here's how I grill corn. Cut corn from the cobs.

Grab: 1/2 tsp salt, 1/4 tsp cayenne pepper, 1/2 can of chicken broth & a 1/4 cup (or so) of cream

Fry bacon until crispy & brown. Remove to paper towels to drain. Pour off all but 2T of the oil. Stir in onions & red pepper, cook until softened but not browned. Add salt, cayenne, corn, garlic & jalapeño and cook 1min more (beware of burning the garlic).

Stir in 1/2 can of chicken broth, scraping up browned bits at the bottom of the pan. Add in the cream (more or less depending on your desired texture) and heat through.

Serve it now or keep it warm & covered at the back of the stove. Monitor the liquid and add more broth or cream accordingly. Once you're ready to serve, stir in the bacon & parsley. This keeps well in the fridge for 2 or 3 days afterwards and even better, the flavors keep developing!

Wednesday, July 8, 2009

Margherita Orzo Salad


Margherita Orzo Salad, originally uploaded by chrisfreeland2002.


This is one of those perfect salads/sides you can throw together in about 20 minutes. It's so simple it doesn't even need a proper recipe. Here goes:

Cook 1/2 lb of orzo in boiling, salted water. Drain well and toss with olive oil in a bowl. Add a pint of (washed & dried) cherry tomatoes to bowl. Chop 10 or so large basil leaves and add to bowl. Cut a large ball of fresh mozzarella cheese into bite-sized chunks (or use marinated bocconcini) and add to the bowl. Add olive oil, balsamic vinegar, and kosher salt to taste & mix well.

Makes 6-8 side dish portions.

Tuesday, May 12, 2009

Fines Herbes Ranch Dressing

I have been experimenting with classic herb combinations: Herbes de Provence, Fines Herbes. There is a reason these combination have been used for centuries, they work and have stood the test of time. Fines Herbes is a blend of parsley, chives, tarragon, and chervil. Fine Herbes is great with chicken, fish, soups and stocks, salads, and very notable with egg dishes. Note: I love Penzeys Spices and am using their spelling.

Ingredients
2 cloves Garlic minced
1/2 teaspoon Kosher Salt
1/4 teaspoon freshly ground Black Pepper
1/2 cup Mayonnaise
1/2 cup Sour Cream
1/3 cup Buttermilk shaken
1 teaspoon White Wine Vinegar or Champagne Vinegar
1 tablespoon Flat Leaf Parsley minced
1 tablespoon Chives minced
1 tablespoon Tarragon minced
1 tablespoon Chervil minced

Add all of the ingredients in to food processor fitted with the steel blade, pulse several times to completely combine. If the dressing is too thick, add more buttermilk 1 or 2 tablespoons at a time until you have the desired consistency.

Makes about 1 1/3 cups

If the garlic is not finely minced you may want to combine the garlic, salt, and pepper in the food processor first, pulse a few times and then add the remaining ingredients. This recipe uses all fresh herbs.


Friday, May 1, 2009

Fried Morels


Morels/Fried Mushrooms, originally uploaded by chrisfreeland2002.


...or what Newsweek calls "Hillbilly Haute Cuisine"...

What you see above is exactly how I've always eaten morels - fresh out of the fryer, drying on paper towels, sprinkled with salt - YUM! I know there are all kinds of amazing recipes for the spring woodland delight - sauteed in butter with pasta, in a cream sauce, and heck even a duxelle, but growing up we had 'em floured and fried. That's how I want morels.

And that's how I prepared the AMAZINGLY generous gift Chris Cozzoni's parents gave me on Thursday, when they presented me with a beautiful batch of morels foraged from local Missouri woods. I've updated the batter a bit, but it's still an easy preparation - clean and slice the mushrooms, dip in egg + Tabasco, roll in flour+corn meal and fry. Simple. Delicious!

Ingredients

10 large morels - must be fresh, not dried & reconstituted! Seasonal only!!
2 eggs
Dash of Tabasco
1/2 cup flour
1/2 cup yellow corn meal
1 tsp kosher salt
1/2 tsp ground black pepper

If you've foraged them yourself:
Slice morels in half, or quarters for large 'shrooms. Brush off soil and bugs and things. Soak in a sink full of salted water (it kills the little slugs. eww, sorry, gross, I know) for 15 minutes. Using a net scoop the morels out and lay on paper towels to dry. Follow below.

If you've purchased fresh morels:
We'll assume the morels have already been brushed down and all soil and woodland critters removed. Slice them and soak them in a small pan of lukewarm water for 5 minutes, until slightly spongy. Remove to paper towels to dry. Follow below.

Heat FryDaddy, or large pan with 3"+ of oil.

Gently blot the morels with paper towels to remove excess moisture. In a shallow dish, lightly beat two eggs and a splash of water and 2 dashes of Tabasco (or to taste). In another dish, combine flour, corn meal, salt & pepper. Dip morels into egg, then into flour mixture. Shake off excess and set on baking sheet.

Fry morels until golden, turning often in oil to ensure even frying. Drain on paper towels and sprinkle liberally with kosher salt. Serve immediately.

Monday, March 2, 2009

Buttermilk Cheddar Biscuits


I love biscuits. And lucky for me, being a southern boy, we had them all the time. Hot out of the oven with butter or jam, that is heaven. Here’s the problem. Biscuits are a little tricky. There are few ingredients, a simple process, and somehow easy to miss the target. I may never be able to make biscuits like my Mama but, these are really good.

Ingredients
2 cups All-Purpose Flour, plus extra
4 teaspoons Baking Powder
¼ teaspoon Baking Soda
¾ teaspoon Salt
2 tablespoons cold Butter
2 tablespoons cold Shortening
1 cup cold Buttermilk
1 cup grated White Cheddar or Extra-Sharp Cheddar Cheese, plus extra

Preheat oven to 450 degrees.

In a large mixing bowl, combine flour, baking powder, baking soda, and salt. Using a pastry blender, cut in butter and shortening till well mixed and resembles course crumbs. Make a well in the center of the dry mixture and add buttermilk. Stir a little then add cheddar cheese. Stir until dough just comes together. With your hands, try and form the extra dough pieces into the dough ball.

Turn dough out onto a lightly floured board. Dust top with a little flour and knead dough by folding and pressing dough over on to itself 6-8 times. Pat out dough to ¾-inch thickness. Cut out biscuits with 2 to 2 ½-inch floured round biscuit cutters. Push straight down to board then turn slightly. Place biscuits about 1-inch apart on ungreased baking sheet and sprinkle with extra cheddar cheese.

Bake for 12-14 minutes until tall and golden.

Makes 8-10. Server hot with butter, jam, or split apart and add extra cheddar cheese for a cheese biscuit sandwich.

I like the white cheddar for a milder morning biscuit and the extra-sharp cheddar for a lunch or dinner biscuit. If you do not have a pastry blender use a fork, two knives, or your fingers. If you use your fingers work quickly. You do not want part of the butter to melt. The cheese will cause the biscuits to stick slightly. Use a spatula and they will come off just fine.

For a traditional biscuit eliminate the baking soda and cheddar cheese; and use milk for the buttermilk.


Sunday, March 1, 2009

Buttered Potatoes with Asparagus Leek Cream Sauce


Buttered potatoes with asparagus & leek cream sauce, originally uploaded by chrisfreeland2002.

This dish was inspired by my recent trip to Copenhagen. I was there for my 'real' work (as opposed to this, my 'fantasy' work), and had the great opportunity to eat some delicious meals in the University of Copenhagen cafeteria near the Zoologisk Museum. No, really! The canteen, as it was called, had really excellent food; a far cry from the dorm food foisted on college students in the US.

Granted, my exposure was limited, but I'd say that Danish cuisine is about assembling several small plates of both hot and cold items, each featuring fresh vegetables and clean, bright flavors, to make a cohesive meal. The terms that keeps coming to mind when trying to describe the dishes we had are "honest" and "authentic" - each was prepared with fresh ingredients and done so in a way that highlighted the intrinsic colors and flavors of the dish's components, rather than hiding them under heavy spices. This particular dish was a standout because of its simplicity. I found it very easy to recreate back at home, and bet you will, too, if you give it a try.

Ingredients

3 lbs small yellow potatoes (Pearl work nicely, as do small Yukon Gold)
2 T butter
3 T Italian parsley
1tsp salt
1/2 tsp pepper

Sauce
2 T butter
1 medium leek, chopped & well rinsed
8 asparagus spears, cut lengthwise, then chopped
1/4 cup flour
2 T dry white wine
1 1/2 cups heavy cream
1 cup chicken stock
Salt and pepper, to taste

Scrub potatoes and place them in a large pan. Fill pan with water until potatoes are just covered. Bring to a boil over high heat, then boil for 18-20 minutes, or until potatoes are soft throughout. While boiling, make sauce below. Use a colander to drain potatoes, then cover colander and potatoes with a cloth. Let potatoes steam and additional 10 minutes, then toss with butter, chopped parsley, and salt and pepper to taste.

For sauce, melt butter in a large saucepan over medium heat. Once butter is heated add leeks and cook until slightly softened, about 4 minutes. Add asparagus and cook an additional 5 minutes, stirring often, until asparagus and leeks are fragrant and soft. Add flour and stir to combine, making a thick roux. Cook until roux is golden, but not browned, about 5 minutes.

Add white wine and stir to incorporate, making a thick slurry. Then add chicken stock and bring to a simmer, stirring constantly (I use a spoon rather than a whisk for this because I don't want to shred the softened vegetables). Add cream, stirring, until well combined. Again bring sauce just to simmer, then reduce heat to low. Cook until sauce is thickened, approximately 10 minutes (add more chicken stock, if needed, to thin sauce) - it should be thicker than a soup but not a gloppy gravy. Remove sauce from heat and taste, adding salt and pepper to taste.

Serve sauce over potatoes, with a toss of chopped parsley on top and a sprinkle of sea salt.

Wednesday, February 11, 2009

Venison Chili


Venison Chili, originally uploaded by chrisfreeland2002.


Deer hunting is so popular where I grew up that it borders on religion; hunters have their tried and true rituals and favorite locations, honed over years (even generations) of practice and experience. Recipes for how to prepare "deer meat" (no one calls it venison in the country) have also been handed off over time. Most recipes feature slow roasting deer steaks in a thick gravy to add moisture and soften the meat, as it's fairly lean and can be a bit dry and tough if not prepared correctly.

While that method is a country classic, and one that my mom and aunt make with skill, I've become a fan of using venison in chili. Venison can be slightly gamey and I find it mellows really well when cooked with acidic foods like tomotoes, and with ground venison you don't have to worry about tenderizing it through a slow cooking process. The recipe below takes some cues from fairly traditional chili ingredients, but turns up the flavor with red wine and unsweetened chocolate, which also tone down the venison without completely masking its unique flavor.

Oh, and to obtain ground venison you can do what I do (have your dad apply for a license, make him sit in the woods on a cold autumn morning waiting for a deer to pass by, shoot it, field dress it, and then take it to a local butcher for processing) or buy it from online sources, such as this one http://www.venison-meat.com/html/suppliers.html.

Ingredients
2 tsp olive oil
3 lbs ground venison
1 tsp whole cumin
1 large onion, chopped, divided in half
1 red pepper, chopped
1/2 tsp chili powder (or more for your desired heat)
1 tsp salt, to taste
1/2 tsp ground pepper, to taste
3 cloves garlic, minced
3 T tomato paste
1 cup dry red wine, additional as needed
1 lb tomatoes, diced or 2 cans diced tomatoes
1 oz unsweetened chocolate, chopped
1 cup water, additional as needed

Heat oil in a large dutch oven or soup pot over medium-high heat. Add half of chopped onion to oil and cook until softened, about 2 minutes. Add venison and cook until thoroughly browned. Tilt pan to allow juices to accumulate at the bottom and use a slotted spoon to remove venison and onion to a bowl.

Add another tsp of oil to pan if needed. Add cumin and cook for 2 minutes, stirring constantly, until cumin is browned and fragrant. Add remaining onion and red pepper and cook until golden, about 5 minutes. Add chili powder, salt, pepper, and garlic and cook for 1 minute. Add tomato paste and stir vigorously for 2-3 minutes, until paste starts to thin. Add the red wine, stirring until contents of the pan are well incorporated and the sauce has a smooth texture. Return venison to the pot. Add tomatoes and cook, stirring, until the chili starts to bubble. Reduce heat to simmer and cover pot. Cook for 30 minutes, then add chopped chocolate. Cook an additional 15 minutes (but the longer the better!), stirring occassionally, adding water or wine (your preference; guess mine) if the chili becomes too thick. Remove pot from heat and let chili rest a few minutes before giving a final stir.  Serve with toppings.

Toppings/Sides
Shredded cheddar cheese
Sour cream
Chopped green onions
Corn bread or crackers


Monday, January 19, 2009

Chicken & Sausage Hash on Crispy Polenta with Frizzled Sage


Ingredients
2 bone-in, skin-on chicken breasts
1 lemon, ½ sliced, ½ squeezed
½ tsp olive oil
½ lb bacon, sliced
3 spicy Italian sausages (salsiccia or similar, can substitute with brats)
1 ½ cup onion, chopped
1 red pepper, chopped
10 small new potatoes, unpeeled, cubed
1 ½ tsp kosher salt
½ tsp fresh ground pepper
3 cloves garlic, minced
½ tsp fresh sage, chopped
¼-1/3 cup flour
¼ cup cognac
4 cups (or 2 cans) of chicken broth
1 cube of frozen pesto or 2 tsp dried basil

Preheat oven to 400.

Place chicken bone down on a baking sheet and gently separate chicken skin from the underlying meat to make a pocket. Place lemon slices under skin. Season chicken with salt & pepper and drizzle slightly with oil. Bake until chicken tests 170 degrees, approximately 40 minutes. Remove sheet from oven and tent chicken with foil for 10 minutes. Let cool, then pull meat from the bones and shred into bowl. Save the skin and bones to freeze for stock. Discard the lemon.

In large dutch oven heat the olive oil over medium heat then add the bacon. Cook until browned. Remove bacon from oven with a slotted spoon and lay on paper towels to drain. Add sausages to oven and cook until browned, then remove to paper towels. Add onions, red pepper, potatoes, salt and pepper to pot and cook until vegetables are slightly softened and browned, about 7-10 minutes. Add garlic and chopped sage and cook for 1 minute.

Add between ¼ and 1/3 cup of flour, depending on the amount of grease in your pan. You want enough flour to evenly coat all the vegetables and soak up all the grease, but not so much that it cakes up. Stirring constantly, continue cooking the flour until it becomes darker, but not burnt, and releases a nutty scent, about 5 minutes.

Add cognac and stir, scraping up the browned bits at the bottom of the pan. Add the chicken stock and stir until smooth, adding more stock if sauce is too thick. Bring to a simmer, then reduce heat to low. While sauce is cooking, cut sausage into 1 “ chunks and add to pot. Add drained bacon, shredded chicken, and pesto. Stir to combine. Cook uncovered 7-10 minutes, until sauce is thick and creamy.

Crispy Polenta
Heat FryDaddy (makes this a snap). Slice pre-made polenta into ½” rounds. Blot with paper towels to remove any extra moisture. Gently place in heated oil, frying until golden brown, turning once to ensure even frying. Drain on paper towels. Sprinkle with kosher salt.

Frizzled Sage
Wash 10-12 whole sage leaves. Blot on paper towels to dry completely. Place the individual leaves in hot oil for 10 seconds. Remove with tongs and drain on paper towels.

Serve hash on polenta topped with frizzled sage.

Thursday, January 8, 2009

Alice & Julia's Apple Tart


Look, I’m going to cut right to the chase. I have taken the best parts of recipes from two very, very famous women – Julia Child and Alice Waters – and combined them for the perfect Apple Tart. It simply turned out to be the loveliest, most delicious apple pastry I’ve ever made…and I’ve cooked a lot of apple pies. This was hands down the best.

So here’s the recipe: Julia Child’s Pâte Brisée + the filling and glaze from Alice Waters’ Apple Tart, as described here. I get that as recipes goes mine isn’t much of one, but you know what? Theirs are classics, and they work perfectly together. I can't pass off some sad facsimile of them as my own, so go forth and conquer as I did with Julia and Alice’s help.

Wednesday, January 7, 2009

Black-Eyed Peas and Hog Jowl - New Year's Day Tradition


In the South, at least where I come from, you eat black-eyed peas and hog jowl on New Year’s Day to bring good luck for the upcoming year. Some regions are slightly different like Hoppin’ Johns, a black-eye pea and rice dish, or black-eyed peas and collard greens. But for me, we had black-eyed peas and hog jowl every January 1st. I like black-eyed peas, though I prefer purple hull peas. Hog jowl is from the jaw/jowl/check of a hog and is like fatty bacon (if that is at all possible). It can be a little difficult to find. I went into a grocery in one of the more affluent areas of St. Louis and after looking in the meat section and not finding it asked the butcher who gave me a little smirk and said “No, you will not find that in this store.” All I can say to you citizens of Frontenac is that 2009 will not be kind to you. Lucky for me, I did finally find some hog jowl and 2009 is going to be a good year.

This is not culinary masterpiece. Having it once a year will be fine for most. But, it’s tradition, fun to do, and it's for good luck. It can't hurt. I served mine with some picked onions I made a year or so back.

Ingredients
1 small slab of Hog Jowl
1 15 ounce can Black-Eyed Peas
Salt
Freshly ground Black Pepper

Cut the hog jowl into thin bacon like strips. In a large skillet, fry hog jowl over medium low to medium heat until desired doneness and crispness. Place hog jowl on a platter lined with paper towel to drain. During this time, heat black eyes peas in a sauce pan over medium heat until hot. Season to taste with salt and pepper.

Serves good luck for 365 days


I find hog howl in a whole piece. But, I have read on other blogs where they have found it pre-sliced. I have never found it that way. If you slightly freeze your hog jowl, it will make slicing it a little easier – about 20 minutes in your freezer. You will get a good amount of fat renderings from the hog jowl and if you fry it too hot a lot of smoke.

Thursday, January 1, 2009

Cowboy Caviar


Cowboy Caviar, originally uploaded by chrisfreeland2002.


Happy New Year, y'all!

Last night we co-hosted a New Year's Eve party with the Nemanicks at their house. I love all the preparations that lead up to a big party and it was great fun to be able to tackle the effort as a team of 4 (Chris & me, Rik & Dawn). Rik and I both love to cook, so we split the responsibilities for food prep. We went with easy dishes that can fuel a crowd; having thrown a New Year's Eve party for more than 5 years I've learned that people will politely nibble and graze up to midnight, then once the champagne kicks in they're diving into the food like they haven't eaten in weeks.

One of the dishes I made is a perennial favorite - Cowboy Caviar. Tagert actually introduced us all to this dish several years ago, and we've all started making it for parties. It's a simple yet delicious mix of black-eyed peas and spices that you can serve as a dip with chips, and since black-eyed peas are a New Year's Day tradition in many parts of the country, I thought this was a clever dish to crank out for a New Year's Eve crowd.

I always make too much, by design. The flavors continue to develop over a couple of days, so I use leftovers as a topping for chicken or rice. Oh, one last thing - I (we) use canned black-eyed peas. I've tried using the dried ones and preparing them from scratch, but honestly the flavor wasn't any better and it was WAAAY more complicated that just opening a few cans. I know, I know...but look, when you're cooking for a crowd you want to figure out some dishes that you can easily throw together with a delicious result, and this recipe definitely fits those requirements. Enjoy!

Ingredients
3 cans black-eyed peas, drained
2 green onions, chopped
3 cloves garlic, minced
1 red bell pepper, finely chopped
3 T cilantro, finely chopped
1 jalapeno, seeded and chopped
1 tsp salt
1/2 tsp pepper
2 T vegetable oil
2 T cider vinegar
Juice and zest of 1 lime

Combine ingredients in a big bowl. Cover and refrigerate overnight to allow flavors to develop. Serve with chips, or as an accompaniment to meats or rice. (Told you it was simple!)