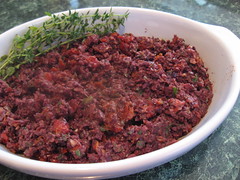
I’m a fan tapenade. And with the holidays upon us it is a great, easy to make appetizer spread. Everything goes in the food processor. No baking. Little fuse. But, not everyone likes olives and tapenade. My tapenade with sun dried tomato might just win them over. The sun dried tomato gives it a little bit of sweetness and cuts down on some of the briny olive taste. The sun dried tomato makes it a little extra special and the small flicks of red give it a little holiday festive flare.
Ingredients
1 pound Kalamata or other good black olive - pitted
3 tablespoons Capers - drained
2 cloves Garlic - minced
8.5 ounces Sun Dried Tomatoes in Olive Oil and Herbs, Julienne Cut - oil reserved
good Extra-Virgin Olive Oil
2 tablespoons Lemon Juice – freshly squeezed
2 teaspoons Dijon Mustard
2 teaspoons fresh Thyme - chopped
2 tablespoons fresh Parsley - chopped
Crackers or toasted sliced Baguette
Combine olives, capers, and garlic in a food processor fitted with the steel blade and pulse a few times till very roughly chopped. Add enough olive oil to the oil reserved from the sun dried tomatoes to make ½ cup. Roughly chop the sun dried tomatoes. Add the sun dried tomatoes, ½ cup oil, lemon juice, mustard, thyme and parsley and process until combined but still chunky. You still want to be able to see bits of the sun dried tomato.
Serve with crackers or toasted baguette. Makes a large potion enough for a good sized party.
I buy pitted olives and then cut each one in half. I find on average one pit per pound of olives. This recipe can easily be halved. Divide all the ingredients in half, just watch the amount of oil you add to get the consistence you want. To make a traditional tapenade: delete the sun dried tomatoes, use only olive oil, and add 10 anchovy fillets. Also, see the crostini blog post that goes excellently with this tapenade.

Sunday, December 14, 2008
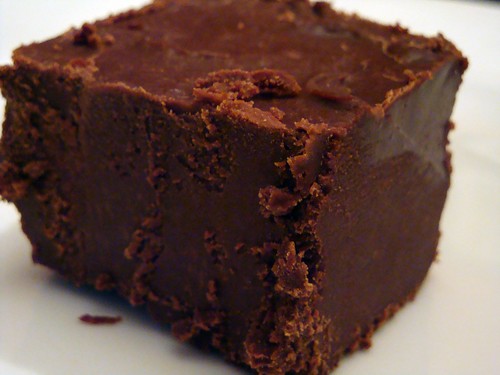
Grandma Ellen's Fudge
My grandma Ellen has a legendary sweet tooth. To this day she will start a meal with a slice of pie or other dessert so that she can be sure to "have enough room for it." I inherited her love of sweets, and her solemn understanding that the most important part of a meal...no, of life...is a sugary confection, cake, or pastry.
Although she was reknowned for her pie-making skills (Best. Crust. EVER!), she was no shlub with candy either. One of her specialties was a rich, dense fudge that she made by the acre during the holidays. Now in her late 80's, she has given up cooking, but luckily my family and I have had a lifetime of working alongside her to learn her tips and tricks. One of the best lessons I learned from her was to experiment, and over the years I've figured out a few tweaks to her base recipe that sit well with my particular palette and culinary point of view. I now regularly include instant coffee and ground cardamom, both of which spice up the chocolate and really enhance the flavor of the fudge.
I naturally think of Grandma every time I make this fudge, and I pass it along here so that you can enjoy it as well. Fair warning: this fudge is really, really rich (which, come on, is NOT a bad thing when you're talking about fudge). You'll want a tall glass of cold milk onhand, and possibly some give in your waistband because I guarantee you'll eat several pieces. And you will be happier for doing so!
Ingredients
1 cup whole milk
1/2 lb unsalted butter
4 cups sugar
25 large marshmallows
2 oz. unsweetened chocolate, chopped
12 oz. dark chocolate, chopped
12 oz. milk chocolate, chopped
1 tsp vanilla
1 T instant coffee
1/4 tsp ground cardamom
Pinch of salt
Butter a 9x13 glass baking dish and set aside.
Heat milk, butter, and sugar in a large heavy-bottomed pan over medium heat until dissolved (I use a 5qt enameled cast iron pot). Stir in marshmallows until dissolved, then bring to a slow boil. Remove from heat and stir in chocolate and spices until well blended. Pour into the buttered baking dish and refrigerate 4-6 hours, until solid.
To cut, remove from fridge & bring to room temperature. Cut into squares and store in an airtight container, separating layers with waxed paper. Store, refrigerated, up to 2 weeks. You can either serve it cold (meaning: eat it straight out of the container every time you walk by the 'fridge) or let it come to room temperature for a smoother texture. Either way it's delicious!
Sunday, November 23, 2008
Alimentos en Buenos Aires

Or "Buenos Aires Food" (sorta). I just returned from a few days in Buenos Aires, which is a magnificent, grand, and beautiful city; I was thoroughly enchanted by its architecture and people. And the food! Of course, the food. So no surprise, we ate A LOT of beef - one day we had steak for lunch AND dinner - and it was fantastic. The phrase "beef eater's paradise" was mentioned more than once (of course quickly countered by "...and a cow's hell" by the vegetarians in our midst). Some culinary highlights:
- Bife de chorizo - Sirloin steak. Fat on. Seared over an open flame. Perfection. Also of note, only once were we served a chimichurri (a fresh sauce made from parsley, garlic, and spices) alongside - I was under the impression that was a standard pairing, but not at the restaurants we dined in.
- Alfajor - An alfajor, or alfajores, is a popular candy found at street kiosks and was first described to me as a moon pie. It's actually an apt description - 2 cookies with dulche de leche between, covered in chocolate. I love all things caramel-y, so I'm definitely going to try making some of these.
- Empanadas - Sold as street food and starters in restaurants, empanadas are a filled pastry pocket...and are probably quite familiar to most Americans by now, given that they're available in QT of all places (hey, street food is street food). Popular combinations include Empanadas con carne (with beef, as photographed above, flavored with a hint of cinnamon) and Empandas con jambon y queso (with cured ham and cheese).
Cornbread Stuffing with Salsiccia & Apple Cider
Cornbread, salsiccia (or other Italian sausage), and apple cider put an unusual spin on a Thanksgiving tradition:
Ingredients
1 lb (2 loaves) corn bread, cubed
3 lb salsiccia or other Italian sausage, casings removed
2 yellow onions, chopped
1 bag celery, chopped
2 red bell peppers, chopped
12 large sage leaves
½ stick butter (1/4 cup)
1 cup apple cider, divided
½ cup chicken broth
Directions
Preheat oven to 325 °. Spread cornbread cubes in single layer on large baking sheet. Toast in oven for 35-40 minutes until cornbread is crusty on edges, stirring twice during baking.
Remove salsiccia from casings and brown in large skillet. Use a slotted spoon to transfer sausage from pan to large mixing bowl lined with paper towels, reserving oil in pan. Remove paper towel and add toasted cornbread to bowl.
Add chopped onion, celery, and red pepper to skillet and cook until golden (probably have to work in 2 batches – add oil to pan, if needed, during 2nd batch). Add ½ cup apple cider to skillet. Bring to a boil, then reduce heat and simmer for 3 minutes until sauce is slightly thickened. Pour contents of skillet onto cornbread. Melt butter in skillet and add sage, cooking until leaves are dark green, about 3 minutes. Add to bowl.
Mix contents of bowl well. Season with salt & pepper to taste. Butter large baking dish and spoon stuffing into it. Drizzle remaining ½ cup apple cider and ½ cup chicken broth over stuffing. Cover with aluminum foil and refrigerate for 3-4 hours (can be made immediately, but flavors develop if you wait). Bake covered in 350° oven until heated through, 1 hour. Remove foil and bake for another 10 minutes, until top starts to brown.
Monday, November 10, 2008
Roasted Fall Veggies (with radishes!)
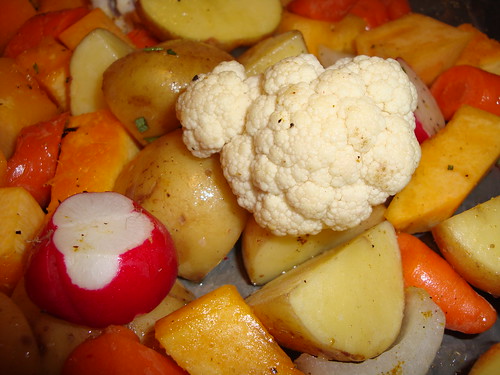
I love roasted vegetables, and I especially love making them in autumn when there are all kinds of delicious root vegetables available. Making roasted veggies is like making chicken stock - you just throw in whatever you have on hand. Sure, there is the Holy Trinity of Carrots, Potatoes, and Onions, but other options abound like parsnips, butternut squash, sweet potatoes, cauliflower...even radishes.
Now, if you've never had a roasted radish you are missing out on one of nature's most sublime roasted vegetables. I like raw radishes, but they do have a bit of a bite. A roasted radish is quite different. Like all roasted veggies it gets sweeter with roasting, but it also gets more...mellow...almost creamy. I've served roasted radishes to two different sets of (enthusiastically voracious) guests to rave reviews. Give 'em a try, either by themselves or with a mix, as below.
Ingredients
1 lb carrots, sliced
2 lbs small potatoes, quartered
1 yellow onion, quartered
1 head cauliflower, broken in florets
1/2 pie pumpkin, cut into squares with the rind off
1 bunch or bag radishes, tops & bottoms cut off
2 tsp olive oil
2 tsp kosher salt
1/2 tsp pepper
1/2 tsp curry powder
1 sprig rosemary, chopped
1 small bunch parsley, chopped
Preheat oven to 400 degrees.
Chop all veggies into pieces about the same size (you want them the same size so they roast evenly). Spread into a single layer in a roasting pan or baking sheet (or two). Drizzle with oil. Season evenly with salt, pepper, curry powder, and rosemary. Mix by hand. Roast for 20-30 minutes, until vegetables are browned but not burnt and tender inside, shaking the pan twice during roasting to make sure the veggies don't stick to the bottom.
Remove pan(s) from oven and place veggies on a large platter. Sprinkle with the chopped parsley and serve.
Sunday, November 2, 2008
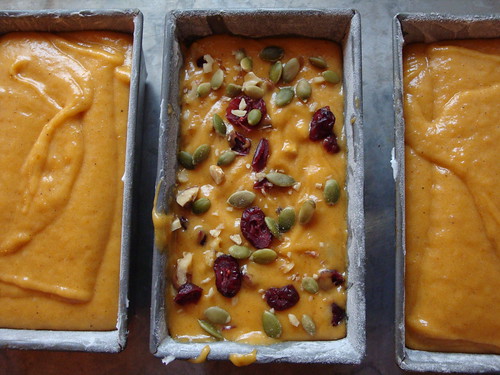
Pumpkin Bread
When I was in Australia two weeks ago, pumpkin was turning up in the oddest dishes - on sandwiches and in quiches & stuffed pastas. This was a good thing, as Chris and I both love pumpkin, and it made me just the tiniest bit homesick to be missing out on prime pumpkin time in the States. So, as soon as I could find some time to cook something to blog about, I knew it would have pumpkin in it.
I went with a fairly traditional pumpkin bread, mostly because Chris Cozzoni listed it at the top of his favorite pumpkin dishes (I live to serve). I used one of my mom's recipes, but of course found a few ways to amp up the flavors by adding in some of my favorite pumpkin-enhancing spices (cinnamon, cloves, fresh ground nutmeg) and crunchy mix-ins and toppings (dried cranberries, walnuts, pumpkin seeds).
One last note: A good friend, and one of the original South Comptonites, Eric Becker, gave me a fantastic gift years and years ago. I was complaining that I didn't have any loaf pans and Eric, in all his generosity & wisdom, gave me 4 mini loaf pans (5.75 x 3.25 x 2.25-in.), rather than 1 or 2 of the regular sized ones. That random act of kindness has begat many more, as I now make 4 mini loaves of breads (pumpkin, banana, zucchini), save one for us, put one in the freezer, and are left with two to give out to friends and neighbors. I would definitely recommend that everyone have a set of 4 mini loaf pans on hand, in addition to 2 regular pans, as those around you will be happy to receive a little loaf of something from time to time.
Ingredients
Dry Ingredients:
3 C flour
1 tsp baking soda
1 tsp baking powder
1/2 tsp salt
1 tsp cinnamon
1 tsp ground cloves
1 tsp fresh ground nutmeg
Remaining ingredients:
3 C sugar
1 C vegetable oil
3 eggs
1 can pumpkin
Toppings & mix-ins:
-dried cranberries
-chopped walnuts
-pumpkin seeds (also sold as pepitas)
Preheat oven to 350degrees. Grease and flour 4 mini loaf pans or 2 regular sized ones.
In a large bowl, measure and combine the dry ingredients. Sift into a medium bowl and set aside.
In a large bowl, or using a stand mixer, beat the sugar and oil until well combined. Beat in the eggs and pumpkin, then add flour mixture, stirring just until the dry ingredients are dampened. Pour mixture into prepared pans.
If you're going to go with the cranberries, walnuts, and pumpkin seeds (all three are great together, or mix and match your faves), add them to the top of each pan then use a knife to cut them into the batter. Sprinkle some on top of the batter, then bake for 1hr, or longer as needed. Check for doneness by sticking a toothpick into the loaf; if it comes out clean it is ready.
Let loaves cool for 5 minutes, then turn out of loaf pans onto a rack. You can use a knife to separate the loaf from the pan, if needed, but the grease + flour should make them pop right out. Let the loaves cool to room temperature, then wrap with aluminum foil. These loaves are actually better the second or third day, so try reeeeaaaally hard to resist cutting into them straight away.
Thursday, October 16, 2008
Halfway around the world on a full stomach

G'day mates!
I haven't been cooking much since September because I haven't been at home much! I've been travelling for my job since the last week of September and will continue at this pace through Thanksgiving. Right now I'm in Sydney with my partner on a week's holiday before heading on to Perth/Fremantle for a conference. Then in November I'll be in Buenos Aires, with 2 stops in Woods Hole, Mass., in between. A hectic schedule, for sure, but exciting!
Inspiring, too. One of the aspects I like most about travelling (both domestic & foreign) is the opportunity to sample new tastes & techniques for incorporation into my own cooking. This trip to Sydney has given me several new ideas, what with Australia's beguiling and delicious mix of Asian, Indian & European cuisines. So, I thought I'd take a few seconds to jot down some of my favorite dishes now, then try to work out the recipes once I'm back home after Thanksgiving.
Here are some of my favorites:
- Lamb skewers with a chili/lemongrass/tamarind dipping sauce at Pink Peppercorn in Darlinghurst. This is a fantastic restaurant featuring 'modern Laotian' cuisine...so good we went twice! This starter was amazing - savory, sweet and smoky all at once!
- Roast beef & pumpkin sandwich with caramelized onions on Turkish bread at CQ Cafe on Alfred Street near the Circular Quay stop (hence the 'CQ'). It's spring here in Sydney, yet pumpkin is showing up all over menus. I was intrigued by the thought of roasted pumpkin on a sandwich, delighted by the taste.
- Tomato, onion, and gruyère quiche at the Wayzgoose Cafe in Leura. We took a day trip to the Blue Mountains (one word: spectacular!) and stopped at this cafe for a late lunch after a looooong day of hiking trails. There really wasn't anything unusual about this dish per se, just a sublimely seasoned & executed dish that hit the spot. Quiches are popular lunches at most cafes and restaurants we visited, and this one was the best I had. Light, airy, perfect.
- update: Zucchini, gorgonzola, and sun-dried tomato pizza at Little Creatures in Fremantle. I know those three flavors wouldn't normally jump to mind when thinking of pizza, but the long, papery thin slices of zucchini were absolutely delicious on this rustic, sauceless pizza. Just a brushing of olive oil on the dough with the veg & cheese...yummy! Little Creatures is a really cool brewery; they make a fantastic Pale Ale - finally, an Aussie beer darker than a lager!!
- update: Bacon & Pumpkin Quiche (pic) at The Merchant Coffee Co. Again with the quiche, again with the pumpkin. But this time with bacon!! And panache. LOVED it!
- update: Lemon Lime Brulee Tart at Dome Coffees (pic). I know this is a franchise, so maybe not so intriguing, but I really liked the idea of caramelized sugar on a tart. Very light, very tasty.
- update: Lemon Lime & Bitters. OK, so this is a commercial drink made by Angostura, but it was unique to me since we don't have it in the States. It would be so easy (and refreshing!) to make - I think the sum total of the ingredients would be 7up with bitters on ice, or you could get all fancy and do a tonic with fresh squeezed lemon & lime & bitters. Regardless, delicious.
- update: Kangaroo. OK, look - I couldn't travel to Australia and NOT try kangaroo. I had it twice; once slow roasted in a brown gravy like venison, once smoked and sliced like a cold cut. I didn't particularly care for either. It's gamey, which I'm actually OK with, but it had a particularly strong aftertaste that I didn't care for. Looking at a kangaroo you can imagine that it's all dark meat. Turns out it is. Turns out I don't like it.
Chris
Sunday, October 5, 2008
Bacon & Blue Cheese Coleslaw

This one's super simple and super tasty. Sometimes I like to spend hours working on a dish, and sometimes I just need to put something together quickly. This recipe falls in the latter category - I just got back from travel and needed to take a dish to a family reunion that would work for 20-30 people, so quick & quantity were the keywords. I've made fancier versions of this recipe before with my own dressing (and will blog them soon), but this fast-and-furious one works really well and gets good reviews from even picky eaters. Enjoy!
Ingredients
1/2 head red cabbage
1/2 head green cabbage
1 lb baby carrots
1 bottle prepared Coleslaw dressing, or Ranch dressing
1/2 lb bacon
4-6oz. crumbled blue cheese or gorgonzola
Cook bacon to crisp. Drain on paper towels and crumble into small pieces.
Using a food processor, grate the carrots and slice both cabbages into a big mixing bowl. (If you're making this in advance, keep the red cabbage out for now and mix it in shortly before serving; it turns everything a bit pink if it sits for more than an hour.) Add the bacon, dressing, and blue cheese, and mix well.
Serves 16-20.
Sunday, September 21, 2008
Slow Cooker Apple Butter

"Ma & Pa", my partner's grandparents, have made homemade apple butter for years, and it's my favorite. Their specialty is making very large batches in an old copper cauldron over an open fire using a wooden paddle to stir (and stir, and stir, and stir) the apples until thick & caramelized. While it's fun to make apple butter that way, it's also an enormous ordeal. So much so that as they've gotten older they've taken to making smaller batches of apple butter on the stovetop. It's just as delicious and so much easier, which suggests to me that good apple butter has more to do with good apples & solid flavorings than a particular cooking technique.
In the spirit of simplifying, I was curious if there was an even easier way to make apple butter. I had picked up a peck of fresh Macintosh apples at Curtis Orchard when I was in Champaign, Illinois, last week with the intention of making apple butter. But then I started reading recipes and they all seemed complex...until I ran across a couple different ones (here and here) that used a slow cooker. Sounded fun & different, so I took those recipes as a starting point and threw in some flavors I like for an urban twist on a country classic.
Ingredients
1 peck cooking apples (most anything besides Granny Smith; I used Macintosh because I am a computer nerd with a sense of humor)
Juice of 2 lemons
5 cups granulated sugar
1 cup vanilla sugar
--or 6 cups granulated sugar
2 tsp ground cinnamon
1/4 tsp ground cardamom
1/4 tsp fresh ground nutmeg
1/4 tsp kosher salt
2" piece vanilla bean, split lengthwise
Peel, core and slice the apples (I use the $20 gizmo shown above to make fast work of this). Toss apple slices in a large bowl with lemon juice. Combine sugar, cinnamon, cardamom, nutmeg, and salt in a medium bowl. Add to apples and toss to coat. Spoon apples & sugar into a large slow cooker and drop the vanilla bean on top. Cover and cook on high 1 hour, stirring occasionally. Reduce heat to low and cook until mixture is bubbly & brown, about 10 hours.
Remove lid and cook for another hour on low heat, allowing water to evaporate and the mixture to thicken. Remove the vanilla bean and scrape the seeds back into the apple butter, stirring well. If you accidentally overcook and it's too thick, just add some apple cider, apple juice, or water to bring to the right consistency. Once cooking is complete spoon the apple butter into prepared half-pint jars and process in a water bath for 5 minutes. Ensure jar is sealed and store in a cool, dark place up to 2 years. Any jars that don't seal should go into the 'fridge for immediate use.
Chris Freeland
cfreeland27@gmail.com
Friday, September 19, 2008
Chicken Pesto Tortellini

This is a dish I make all the time - we probably have some variation on "One Bowl Chicken Pasta" a week. It's simple, quick, and easily improvised based on whatever you have in your pantry or 'fridge. And this week (and for weeks to come) I have our new batch of pesto, so I threw that in for an example of how you can use all those ice cubes of pesto you have sitting in your freezer.
(BTW: This is a great meal for a working couple. You've got 2 large portions to serve for dinner and 2 smaller portions for lunch the next day.)
Ingredients
2 tsp olive oil
2 chicken breasts, cubed
1/2 medium yellow onion, diced
2 cloves garlic, minced
1/4 cup dry red wine
1 can diced tomatoes (or equivalent fresh chopped)
1 T tomato paste
1 cube frozen pesto, or 3 T fresh pesto
1 bag frozen tortellini
After cutting chicken, dry it with paper towels to remove excess moisture. Sprinkle with salt & pepper.
Prepare pan of salted water for boiling frozen tortellini. Begin heating the water to boiling now.
On another burner, heat oil in a heavy skillet (I use my trusty cast iron skillet for this) over medium-high heat. Add chicken and cook 7-10 minutes, stirring until chicken is browned on all sides. Remove chicken to a bowl using a slotted spoon.
Add onion and cook until golden, about 3 minutes. Reduce heat to medium. Add garlic and cook for 1 minute - beware of burning the garlic!
Deglaze the pan by stirring in the red wine, scraping up the browned bits on the bottom of the pan. Cook & stir until smooth, 1-2 minutes. Add the tomatoes and tomato paste, stirring until mixture is well incorporated. Add the chicken & any juices in the bowl back into the sauce.
Bring to a simmer, until tomato sauce is just starting to bubble in several spots, then reduce heat to low. Add the cube of pesto after the sauce has cooled slightly, stirring it in as it melts. Continue cooking on low, stirring occasionally, while you prepare the pasta. Season to taste with salt and pepper.
Cook the frozen tortellini according to package instructions. I prefer the frozen tortellini to the dried kind because it cooks faster - you can use whichever you prefer, or have on hand. Add to a medium sized bowl and toss with a splash of olive oil.
Give the sauce one final stir to make sure the pesto is fully incorporated, then pour onto the pasta. Stir to coat and serve with parmesan cheese.
Tuesday, September 16, 2008
4th Annual (we think) Fest o' Pesto

Several years ago as summer wound down Tagert and I realized that we had each planted far too many basil plants - it was after Labor Day and we still had huge plants covered in leaves. So, we decided to try making several batches of pesto as a way of keeping & storing the excess.
It was a sloppy job & we were woefully short on key ingredients like pine nuts and oil (!!), but the pesto we were able to complete turned out great. We froze the pesto in ice cube trays, which made for easy storage and a convenient serving size to drop into sauces or pasta.
So, the year after that we planted even more sweet basil & got neighbors Rik & Dawn Nemanick into the festivities. Dawn planted & cared for their plants and her husband Rik helped Tagert and I make the pesto. We ended up with tons of pesto that year - so much that everything in my freezer tasted like basil while the pesto was freezing...including the ice cubes!
Then there was the year that I froze everyone's pesto and our refrigerator died before I passed it out. That was a sad, pesto-free year.
Last year we got more organized by, you know, making a list of ingredients and stuff, and buying in bulk. By the time we waded through the pine nuts and oil we still had about 2 plants' worth of basil left to process. We let that go to compost...
I think this year we topped our previous efforts in getting organized and having enough ingredients on hand. Everything went smoothly and we ended up producing more pesto than ever before. Maybe next year we'll get really organized and try to come up with a recipe based on weight of the leaves and process in big batches. But, because we use our own Cuisinart choppers, for now we're kind of limited to smallish batch sizes (5 cups of leaves or smaller).
The other fun thing we've tried the past couple of years is to mix in different ingredients or switch up existing ones. We start off with Ina's basic pesto recipe (as with most Barefoot Contessa recipes it's awesome) and jump off from there - this year Tagert made a sundried tomato pesto that promises to be really tasty, and I swapped out the traditional shredded Parmesan cheese for asiago, which I prefer. We also made small batches with Lemon Basil & Thai Basil, the latter including chopped lemongrass (which I also had in abundance this year).
Regardless of the recipes you try out I think we've found the right approach, which is to do it all in one big, messy day. It's quite an ordeal, what with picking and washing leaves, prepping ingredients, chopping it all up, and trying to neatly spoon the pesto into ice cube trays & plastic containers...but at the end of the day you'll have enough pesto to share with friends and plenty to keep for your use throughout the next year.
One last note - we've realized that making pesto is kinda expensive. The basil is incredibly cheap, but add in pine nuts & walnuts (Ina's recipe calls for both), good olive oil, and Parmesan cheese and you can easily hit $100+ in supplies. But, compared with the outrageously priced containers of herbs in the produce section, your homemade dollop of frozen pesto is a delicious steal.
Ingredients & Instructions
1. Prep basil
- Cut the plants off at the ground.
- Pick off the leaves and put them in a large tub or bin
- Rinse & drain leaves at least twice
- If you have the manpower & an extra container to spare, start one person on the job of drying the basil leaves using a salad spinner (or two). It helps to divide the labor when you're making big batches, as opposed to each person working his or her own batches through from start to finish.
- Toast walnuts & pine nuts.
- Shred parmesan wedges in food processor using the chopping blade. It's noisy, but an incredibly simple, quick way to complete what is normally a slow, painful job!
- Chop garlic.
- We recommend Ina's basic recipe for pesto that she uses in her Pasta, Pesto & Peas. Ina rocks!!
- Substitutions we like:
- Cut the 1 1/2 cup of oil back to 1 cup for a thicker pesto.
- Asiago instead of Parmesan cheese.
- Use lemon basil instead of sweet basil, or add lemon juice & zest to sweet basil.
- Add chopped sundried tomatoes before pureeing leaves.
- ***BUT DON'T DO THESE ALL AT ONCE! Try one, maybe two, substitutions per batch, as the original recipe is really such a classic and you can easily veer off into some odd pestos by mixing up too many flavors.
- Using a spoon, drop pesto into clean, dry ice cube trays.
- Air will turn your lovely green pesto black, so cover each cube with a drizzle of olive oil.
- Wrap trays in plastic wrap.
- Stack and freeze.
- After set, you can either leave them in the trays or pop them out and throw them into a big freezer bag.
- Spoon the pesto into small airtight containers.
- Use these larger portions to make a big batch of pesto pasta.
Friday, September 12, 2008
Homemade Pickles
Let me preface this by saying that I am an amateur canner. No one has died from my canning...yet...
That said, the canning I did this year has turned out remarkably well! The Summer Berry Jam has been a big, big hit with everyone, and my latest batches of dill pickles and other pickled veggies have also been delicious.
I say "latest" batches, but I actually made these about 6 weeks ago when pickling cukes & okra were in abundance at the farmers' markets. That's the part about making pickles that I have a problem with - the waiting for the pickling to occur, for the flavors to develop. I'm kind of an impatient person, and this whole 'delayed gratification' thing you have to accept with homemade pickles is, well, hard to accept.
But it's sooooo worth it! Homemade pickles, whether made from cucumbers, okra, green beans, or other veggies, are really delicious and so much more flavorful (and dare I say 'fun') than store bought. Plus, when you're making your own you can try different spices and seasonings and really come up with something unique...for instance...
Cardamom is my secret weapon in spicing up homemade pickles, specifically green cardamom pods. Cardamom is a small seedpod frequently ground or stewed in Indian and Middle Eastern cuisine, and it adds a really...sultry...flavor to many dishes. (Heck, I even put it in chocolate cake!) You can find cardamom pods in specialty markets; skip the ground, bottled stuff in the spice rack for canning - you want the whole pods.
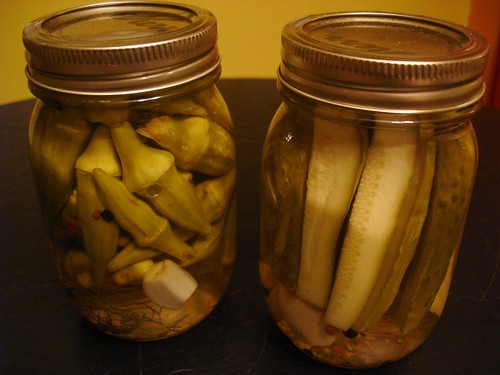
The recipe below can be used on any veg that will stand up to pickling (and that's most, but crunchy green ones are the best). I used the same brine & seasoning to make pickled okra and cucumbers (as you can see in the photo above). I go light on the dill because I like the other flavors, but that's just a personal preference. Again, part of the charm of making your own homemade pickles. Give it a try - you'll become a convert like me!
Ingredients
The brine*
5 tablespoons kosher salt
1/2 cup white wine vinegar
1 teaspoon peppercorns (I use a mix of green, white, red & black)
5 cups water
3 T fresh dill
*This will make enough brine for about 4 pint jars, depending on the veg you use in the pickle.
The pickle
1-2 lbs fresh, washed vegetables (enough to fill the 4 pint jars)
4 cloves of garlic
4 teaspoons peppercorns
4 green cardamom pods, lightly crushed open
1/2 tsp red pepper flakes, divided into 1/8 tsp
4 small heads of dill, totaling about 1/4 cup in all
Prepare your canning jars and lids as instructed by the USDA. Serious stuff here, so really take care to have a clean, sterile environment for your canning.
Cut the vegetables as needed to fit the jars. If you're pickling okra DO NOT cut them open...the gelatinous goop inside that makes gumbo so thick & rich will make your pickles, well, icky.
To make the brine, boil all its ingredients for 3 minutes.
Into each of your hot, prepared jars put 1 clove of garlic, 1 tsp peppercorns, 1 cardamom pod, and 1/8 tsp red pepper flakes. Then add your veggies, then add 1 head of dill, pushing it slightly down into the veggies so that it's not alone by itself at the top of your jar. Using a canning funnel, fill the jar with the brine, leaving 1/2 inch of headspace. Wipe the jar and the rim, place the canning lid & ring, and prepare in a hot water bath for 10 minutes.
Allow flavors to develop for at least 4 weeks before opening. But as soon as that 4th week is over crack one of 'em babies open & crunch away! These are great served as part of a ploughman's plate or cheese spread, or of course just by themselves. They will keep up to a year in a cool, dark place, and up to a month after opening in the 'fridg.
*Brine recipe adapted from one of the most fascinating cookbooks I've read in a long time, Charcuterie: The Craft of Salting, Smoking, and Curing by Michael Ruhlman (Author), Brian Polcyn (Author), Thomas Keller (Foreword).
That said, the canning I did this year has turned out remarkably well! The Summer Berry Jam has been a big, big hit with everyone, and my latest batches of dill pickles and other pickled veggies have also been delicious.
I say "latest" batches, but I actually made these about 6 weeks ago when pickling cukes & okra were in abundance at the farmers' markets. That's the part about making pickles that I have a problem with - the waiting for the pickling to occur, for the flavors to develop. I'm kind of an impatient person, and this whole 'delayed gratification' thing you have to accept with homemade pickles is, well, hard to accept.
But it's sooooo worth it! Homemade pickles, whether made from cucumbers, okra, green beans, or other veggies, are really delicious and so much more flavorful (and dare I say 'fun') than store bought. Plus, when you're making your own you can try different spices and seasonings and really come up with something unique...for instance...
Cardamom is my secret weapon in spicing up homemade pickles, specifically green cardamom pods. Cardamom is a small seedpod frequently ground or stewed in Indian and Middle Eastern cuisine, and it adds a really...sultry...flavor to many dishes. (Heck, I even put it in chocolate cake!) You can find cardamom pods in specialty markets; skip the ground, bottled stuff in the spice rack for canning - you want the whole pods.
The recipe below can be used on any veg that will stand up to pickling (and that's most, but crunchy green ones are the best). I used the same brine & seasoning to make pickled okra and cucumbers (as you can see in the photo above). I go light on the dill because I like the other flavors, but that's just a personal preference. Again, part of the charm of making your own homemade pickles. Give it a try - you'll become a convert like me!
Ingredients
The brine*
5 tablespoons kosher salt
1/2 cup white wine vinegar
1 teaspoon peppercorns (I use a mix of green, white, red & black)
5 cups water
3 T fresh dill
*This will make enough brine for about 4 pint jars, depending on the veg you use in the pickle.
The pickle
1-2 lbs fresh, washed vegetables (enough to fill the 4 pint jars)
4 cloves of garlic
4 teaspoons peppercorns
4 green cardamom pods, lightly crushed open
1/2 tsp red pepper flakes, divided into 1/8 tsp
4 small heads of dill, totaling about 1/4 cup in all
Prepare your canning jars and lids as instructed by the USDA. Serious stuff here, so really take care to have a clean, sterile environment for your canning.
Cut the vegetables as needed to fit the jars. If you're pickling okra DO NOT cut them open...the gelatinous goop inside that makes gumbo so thick & rich will make your pickles, well, icky.
To make the brine, boil all its ingredients for 3 minutes.
Into each of your hot, prepared jars put 1 clove of garlic, 1 tsp peppercorns, 1 cardamom pod, and 1/8 tsp red pepper flakes. Then add your veggies, then add 1 head of dill, pushing it slightly down into the veggies so that it's not alone by itself at the top of your jar. Using a canning funnel, fill the jar with the brine, leaving 1/2 inch of headspace. Wipe the jar and the rim, place the canning lid & ring, and prepare in a hot water bath for 10 minutes.
Allow flavors to develop for at least 4 weeks before opening. But as soon as that 4th week is over crack one of 'em babies open & crunch away! These are great served as part of a ploughman's plate or cheese spread, or of course just by themselves. They will keep up to a year in a cool, dark place, and up to a month after opening in the 'fridg.
*Brine recipe adapted from one of the most fascinating cookbooks I've read in a long time, Charcuterie: The Craft of Salting, Smoking, and Curing by Michael Ruhlman (Author), Brian Polcyn (Author), Thomas Keller (Foreword).
Sunday, August 24, 2008
Grilled Corn on the Cob with Chipotle Lime Butter

I grew up in the middle of a cornfield in Illinois. Corn everywhere. The unpalatable, 'agricultural-industrial complex' kind of corn that Michael Pollan writes about in The Omnivore's Dilemma, destined to be made into high-fructose corn syrup, packaged foods, and all kinds of bad things. Imagine being surrounded by corn you couldn't eat all summer, like being thirsty in the ocean. I hated that corn.
Sweet corn...well, that's another story. Just-picked sweet corn is the best food on the planet, I think. Sweet and crunchy, it's even good raw, right off the ear. Go ahead, try it! Cut it into a salad and you'll become a convert. Of course growing up we'd do the traditional preparation - throw it in boiling, salted water for a few minutes, then slather it with butter. Perfection.
You could stop reading right there. Boil corn, butter it, eat it, or eat it raw. Blog posting over! But, given that our charge is to update farmhouse classics, I'll tell you how I do corn now: I grill it and brush it with seasoned butter, to raves.
I first read about this approach in Bon Appetit, and have since come up with my own way of making the Chipotle butter that I think works better than the original recipe - I season the butter in a ramekin and brush it on the corn as it grills, then squeeze a lime over the corn once it's done and finish it off with a flick of kosher salt. There's just something so wonderful about the sweet smokiness of the grilled corn that matches well with the bright flavors of the lime and the warmth of the chipotle and butter. Sweet corn is delicious on its own; this preparation takes that base flavor and cranks it up to 11. Enjoy!
Ingredients
4 ears sweet corn, husks and silks removed
1/2 stick butter, softened to room temperature
Juice and zest 1/2 lime, reserve other 1/2 lime
1/2 t kosher salt
1/4 t Chipotle Chile powder
Remove the husks and silks from the corn.
Cube the butter into a ramekin or other heatproof container. Let sit for at least 30 minutes at room temperature to soften. Top with the salt, Chipotle, lime zest and lime juice, and mash together with a fork to combine.
Brush one side of the corn with butter and place buttered side down on a medium-hot grill. Brush and turn the corn while it grills, about 3-5 minutes, until the corn is evenly cooked (a little char is perfect - adds to the flavor). Remove from grill, squeeze reserved 1/2 lime over corn and sprinkle with kosher salt. Serve immediately. Pass out toothpicks after dinner. Receive congratulations from your guests.
Saturday, August 16, 2008
Reunited and it tastes so good...

Dear Sourdough Starter,
I'm glad I gave you one more chance. This time you gave back!
I'm sorry I doubted you, and that I threatened to throw you out. You know I'd never do that. It was a wake-up call, Sourdough Starter, and I'm glad you've woken up. Can we forget all that ugliness?

Love always,
Chris Freeland
cfreeland27 (at) gmail.com
Sunday, August 10, 2008
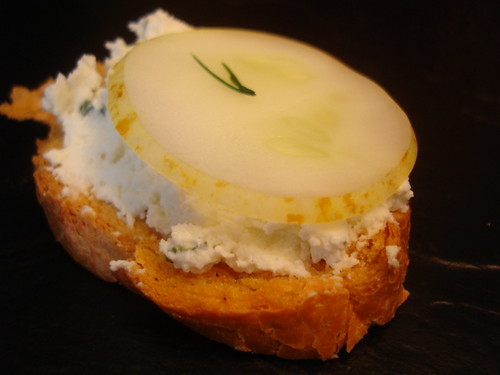
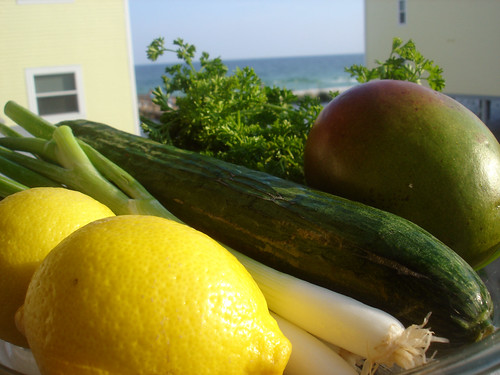
Homemade Ricotta & Heirloom Cucumber on Crostini
Last night we had Tagert & Mikey and Sharon & Mark over for a quick, throw together meal. It was a lovely time. Today I went scrounging for leftovers and pulled together a delicious lunch from bits of the antipasto platter, with my homemeade ricotta and heirloom cucumbers, and some chimichurri sauce I had served with grilled steak.
To be honest, the ricotta needed something. It was my first batch, so didn't know how much, if any, salt or other seasonings to add. The creamy texture was perfect, but it needed something to punch up the flavor.
So, I added a 3T of chimichurri and about 4T of heavy cream to 1 cup of ricotta and mashed it together with a fork. I let that sit for an hour to let the flavors develop (I bet it will keep getting better the longer it sits), then spread it on crostini & topped with fresh sliced heirloom cucumbers. The bright flavor of the chimichurri really helped bring the ricotta to life and turned it into a delicious spread that I can guarantee I'll make again and again...
This is a fun counterpoint to the radish sandwich I made a while back (and have kept making) , and in fact I think I'll serve them together sometime.
Homemade Ricotta

As you know I've been having trouble getting a sourdough starter to start. It's been depressing. So, I decided to leave breads behind for a bit and try my hand at another farmhouse staple - homemade cheese.
The latest issue of Saveur has an article on making ricotta. It sounded amazingly simple. Then, I read this bit in the NY Times which made it sound even easier. I also got some encouragement from Veronica Baetje, of Baetje Farms, who gave me some pointers and a good tip I'll pass on in the next recipe, with thanks. After my *weeks* of failure (sob) with sourdough, the prospect of making something traditional, yet cool, in about an hour sounded like just the thing to bring back my countrypolitan mojo. So I gave it a go.
OMG (as the kids say)! Not only was the ricotta easy to make, but it tasted so incredible - really creamy and fresh. I had folks over for dinner last night and served the cheese as part of an antipasto platter. I think they were suitably impressed and we came up with some suggestions for how to flavor & season the next batches. I can't wait!
Ingredients1 qt whole milk
1 cup buttermilk
1/8 cup heavy cream
Heat milks and cream in a large pot over medium-high heat, stirring frequently to keep the milk from scorching. Use a candy or instant-read thermometer to heat to 180 degrees. Stir gently as the curds start forming around 175 degrees. Once the mixture reaches 180 degrees use a fine mesh sieve to scoop out the curds. Drop into a ricotta mold or colander lined with cheesecloth. Let drain for a couple of minutes, then gather the edges of the cheesecloth and twist together. Hang over a bowl to let the remaining whey drip from the cheese, about 1 hour. Gently remove the cheese from the cloth and serve immediately or refrigerate in an airtight container for up to 3 days.
Recipe adapted from NY Times & “Michael Chiarello’s Casual Cooking” (Chronicle, 2002).
Chris Freeland
cfreeland27 (at) gmail.com
Friday, August 8, 2008
Sourdough Starter, we have to talk...
Dear Sourdough Starter,
Where to start? These past few days have been great, but I feel like this is a one-sided relationship. I provide - I give you a warm place to live, food once a day, I check in on you regularly, I even talk to you sometimes - and you never give back. You're a taker, Sourdough Starter, and I've had enough.
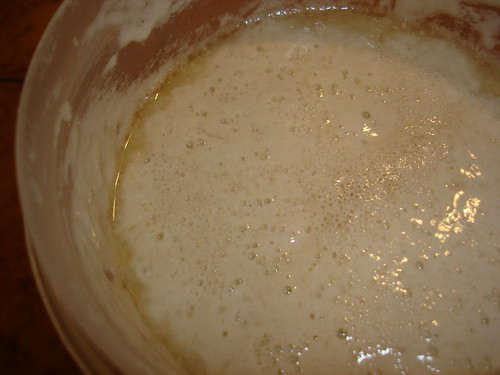
I thought you were ready to move on to the next stage in our relationship. Last night you were bubbly and practically frothing at the mouth of the jar. I was so happy.
So, I proofed you and made you into dough. Once again I spent more time than I should have kneading and flouring and shaping you into something you're apparently not. I left you to rise for an hour and came back to check on you (once again, me checking on you!). You were just...lying there. No rising, nothing. Just sitting there, flat and heavy as a doorstop. I waited longer and still nothing! I don't need a doorstop, I need bread!
Sourdough Starter, what happened? We were going great, I thought. Sure, you kinda had a funky smell but I was willing to look past that. I thought that one day you'd grow out of it. That you'd mature. But no. I guess I was just projecting.
I've come to realize that I tried to make you something you're not. You're just not ready to become Sourdough Bread, and I'm going to have to deal with that. I've come to realize that you're just flour and water. Do you know what else is flour and water? Paste! That's right, Sourdough Starter, you're just paste!
Don't worry about me (not that you would). It may take some time, but I'll move on. I may try with another Starter...maybe even one from the internet. I hear you can get them on Craigslist for free.
I just want to say that I've had fun with you. But I can't keep up this charade. You'll never be what I want you to be, and so I'm just going to have to move on. In fact, I already have. I called ahead to Panera and they've...man, how do I say this?....they've set aside a loaf of Sourdough Bread for me. I know it's commercial, but it's better than the nothing you've given me.
So that's it, Sourdough Starter. We're done. It's time for me to move on. I'm going to go console myself with Commercial Bread...
And just to make you feel bad, I'm going to do all things with Commercial Bread that I never could with you, like thump your bottom to see if you're hollow, spread you with butter and jam, and share you with friends. That would have been great, Sourdough Starter, but you ruined it...so down the drain with you!
Love always, but not forever,
Chris
Sunday, August 3, 2008
Parsley Potatoes with Lemon
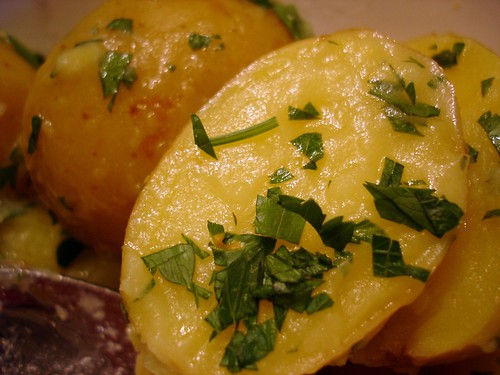
I have a vivid memory of the first time my mom made this dish. Not so much the time (although I was probably around 15 or 16) or place (and therefore living at home), but the mouth-watering reaction I had to the salty, creamy, buttery potatoes mixed with fresh chopped parsley recently cut from our herb garden. It was a revelation in 4 ingredients - potatoes, salt, butter, parsley - that helped form my culinary point of view. I've added a 5th, fresh squeezed lemon juice, to give the potatoes even more zing. Enjoy!
Ingredients
2 lbs small Yukon Gold potatoes, halved or quartered into chunky bites.
3 T butter
3 T fresh chopped flat leaf parsley
1 t sea salt
Juice of 1/2 lemon
Boil potatoes in salted water for 10-15 minutes until cooked through. Drain, then place in a medium bowl. While warm, add butter, salt, parsley, and lemon juice. Stir gently (try not to mash the potatoes) until the butter is melted and the parsley and salt are evenly distributed throughout.
Chris Freeland
cfreeland27 (at) gmail.com
Monday, July 28, 2008
Summer Berry Jam

I bought a variety of summer berries at the farmers' market for a dessert I planned to make on Sunday. But, it was reeeeeally hot in St. Louis this weekend and we ended up going for ice cream instead. So, what to do with 2 qts. of beautiful berries?? Make like a rock band and jam!
Jams, jellies, and preserves are the country way of, well, preserving sweet, ripe fruit at their peak. Macerating and cooking fruit releases pectin, a naturally occurring thickener found in fruits' cell walls, which magically "sets up" the sweet fruit syrup and turns it into a spreadable mixture. You'll find recipes that include a commercial pectin like SURE-JELL, but I prefer to make this without. There's enough pectin in the fruits to make a semi-solid spread, which is the consistency you're going for - the gloppier the better.
I put a 'politan twist on this country staple by adding balsamic vinegar and fresh ground pepper, two oddballs that partner exceptionally well with strawberries. They add a tart and tangy kick that keeps the jam from becoming overly sweet, and makes for an interesting flavor combination. Enjoy!
Ingredients
1 qt strawberries, sliced in half
2 pints of other berries
--At this writing I used 1 pint blackberries and 1 pint blueberries because they were the freshest and ripest.
Juice of 2 lemons
4 T balsamic vinegar
2 t fresh ground black pepper
4 cups sugar
Prepare six 8oz. canning jars and put a small plate in the freezer (go with me on this).
In a large, non-reactive pot, add the berries and cook over medium-high heat 7-10 minutes, lightly mashing the berries to release their juices. Stir frequently to ensure the fruit on the bottom doesn't burn. Stir in the lemon juice, vinegar & pepper, then the sugar. Cook for 15-20 minutes, stirring frequently and skimming the foam from the top of the cooking mixture.
To test how well your jam is jelling, take the plate out of the freezer (see, there was a reason) and drizzle out a bit of the liquid. Wait 30 seconds or so and see if it's starting to set up by tilting the plate. If it runs it needs to cook a bit longer, if it holds its basic shape then it's ready! You want it to be a little runny but firm around the edges.
Spoon the hot jam into the prepared jars. Really, spooning is best - the thick chunks of fruit will make the jam splatter everywhere if you try to pour (again, trust me on this). Wipe the rim of the jar with a clean damp cloth, then seal and process for 10 minutes in boiling water.
Sunday, July 27, 2008
Cherry tomatoes, olives, and mozzarella salad

We're just now starting to get fresh, ripe homegrown tomatoes at our farmers' markets here in St. Louis. I live for this moment all year long as there is nothing more delicious and satisfying than sweet, sunny tomatoes. Tagert had a BBQ last night and I was on the hook for a veggie side so I pulled together this salad, variations of which I've made for years.
NOTE: I used a packaged mozzarella in tiny 1g balls called 'perlini'. If you can't find those, slices of fresh mozzarella will work just as well.
Ingredients
2 pints cherry tomatoes (I made this with one pint of yellow & one pint of orange for color)
2 cups pitted Kalamata olives
1 8oz. container of mozzarella perlini
Dressing
1/2 cup olive oil
3 T white wine vinegar
2 T fresh lemon juice
1/2 t salt
1/2 t pepper
2 T chopped fresh basil
2 T chopped fresh parsley
Combine tomatoes, olives, and mozzarella in a medium bowl. In another both, whisk together olive oil, vinegar, lemon juice, salt & pepper until blended. Whisk in chopped herbs. Pour dressing over tomatoes, olives, and mozzarella and stir gently with a large spoon, making sure the dressing is evenly distributed. Cover and refrigerate, or serve at room temperature.
Monday, July 21, 2008
Salsiccia, goat cheese, and 'Mostarda di Beddu' on Crostini
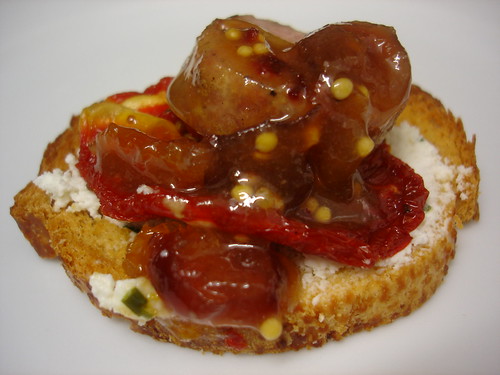
Salsiccia, goat cheese, and 'Mostarda di Beddu' on Crostini, originally uploaded by chrisfreeland2002.
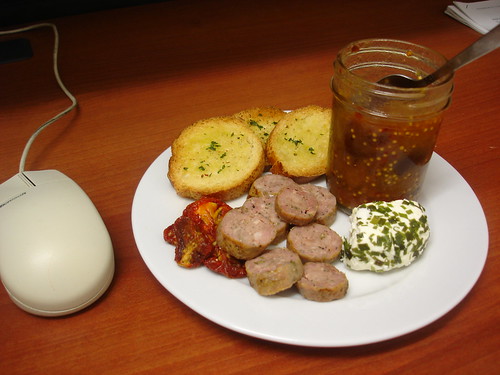
One of the best outcomes of a weekend full of cooking (just take a look at my & Tagert's recent posts!) is good leftovers to take to work. I was able to pull this delicious & simple lunch together from pieces of meals I'd prepared over the weekend. The ingredients included:
- 'Mostarda di Beddu' from Salume Beddu
- Salsiccia from Manzo's
- Goat cheese from Baetje Farms
- Sundried tomato from Schnucks
- Crostini
I've become a fan of Mark Sanfilippo's artisan Italian salumi. The only current retail location for Salume Beddu, as his company is called, is the Tower Grove Farmers' Market and supplies are limited, so you have to get there early to get any of his hand-crafted meats. Alas, I arrived late this past Saturday and he & his wife were already sold out of everything except two spreads - 'Mostarda di Beddu' & 'Cannellini alla Toscana.' I went with the 'Mostarda' because it was a sweet, savory, & salty (my favorites!) spread featuring dried figs & other fruits, red chile, white wine, and mustard seed. I knew it would pair well with the goat cheese I had on hand, so into my lunch bag it went.
Mark may have been out of salsiccia but luckily Manzo's Importing was not. If you've never made the journey to Manzo's at Macklind & Devonshire in South St. Louis then you're missing out on one of the more interesting speciality shops St. Louis has to offer. I've known owner Pete Manzo for years, and have been a fan of the salsiccia he & his family produce for just as long. They do several different kinds of salsiccia, all good, but I'm a fan of their Traditional Salsiccia which has a wonderfully subtle fennel flavor. I had grilled some salsiccia for an appetizer that I took to a dinner on Sunday and luckily had some leftover. I threw those in the lunch bag, too.
I also had a chunk of Baetje Farms' Coeur de la Creme left from a few days back. I've blogged about this fantastic chevre-style goat cheese before, which I still have no qualms about declaring as one of the best cheeses I've ever had. One of my favorite aspects of their cheese is that it keeps really well - up to 2 weeks in the fridge...although I've never been able to keep it for more than a few days because I can't stop sampling!
I rounded out the "nibbly bits" lunch with some sundried tomatoes I had from Schnucks and some herbed crostini I'd made on Sunday with some 2-day-old baguette. Assembly was a snap - I spread the goat cheese on the crostini, layered on a sundried tomato & a slice or two of salsiccia, and topped it all off with a spoonful of the 'Mostarda.' The result was fantastic - crunchy, creamy, meaty, salty, tangy & sweet in every bite! Everyone should have leftovers this
tasty at work!!
Chris
cfreeland27 (at) gmail.com
Grilled Cantaloupe
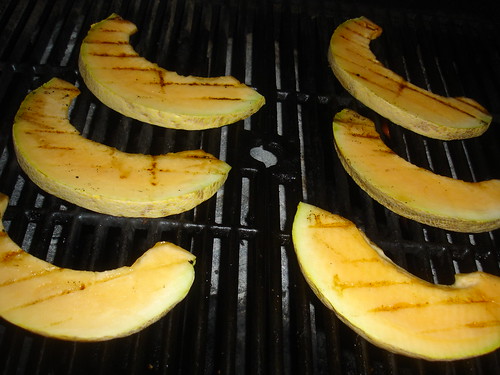
I had folks over for dinner on Friday and banged out a pretty good meal (if I do, ever so humbly, say so myself). I'll blog a bit later about the Chicken with Tarragon Vinegar Grilling Marinade I fixed, but for now I'll start where I finished - grilled cantaloupe for dessert.
I've grilled pineapple & peaches before, to raves, but had never tried a melon. It seems to be all the rage this summer, and I'm never one to let a bandwagon pass me by, so I hopped on. I tried grilled watermelon and grilled cantaloupe. In fact, I paired them on the plate with a scoop of vanilla bean ice cream. Sounds fun, looked great, but to be honest the pairing was off. I did not care for the texture or flavor of the grilled watermelon; to me the smokiness of the grill just turned the normally bright, crisp watermelon into a warm mush.
However, the silver lining here is that the grilled cantaloupe was fantastic! Cantaloupe has a meatier flesh than a watermelon, so I guess it should have been no surprise that it held up well to grilling.
This one is really easy - I just slapped 1/2" slices of cantaloupe across a hot grill, 2-3 minutes each side, until grill marks started to form. I served it drizzled with local wildflower honey and some chopped mint from our herb garden, and a scoop of vanilla bean ice cream. From slicing to plating this dessert took less than 15 minutes to prepare and was a fun way to play with a summertime favorite.
Sunday, July 20, 2008
Crostini
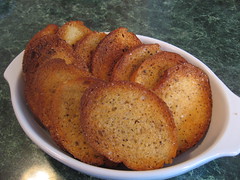
Crackers and are great for cheese plates and spreads. But, sometimes you want something different, a little special, something you made yourself. These crostini fit the bill. I make them fairly often. They are easy and people love them.
Ingredients
1 loaf French Bread or Baguette
Extra-Virgin Olive Oil
Kosher Salt
Freshly ground Black Pepper
Preheat oven to 400 degrees F.
Cut the French bread or Baguette into ½ inch slices on the diagonal. Arrange on a baking sheet. Brush the top of each slice with olive oil. Liberally sprinkle with salt and ground pepper. Bake 10 to 20 minutes until lightly browned and crisp.
Serve at room temperature. Makes between 25 – 40 pieces
There is no need to brush olive oil on both sides of the bread or flip the slices during baking. A loaf of French bread is larger then a baguette cut it slightly on the diagonal too much and the slices may be larger then you need. This makes nice firm crostini that are very good for serving with dips and spreads. Crostini made with the baguette will be even more firm that hold up to dense and hard to spread cheeses.
Tuesday, July 8, 2008
Cherry Clafouti
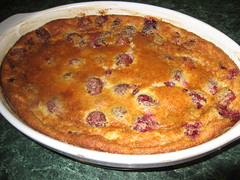
Clafouti is a traditional French dessert made with cherries. But, it’s a little difficult to find a cherry version. Everyone does some other type of fruit. So, I made this cherry version. Clafouti is not a dessert I had growing up. It was the odd name that drew my attention to it. Now, I like the rusticness and comfort of it. It is something I could see having on the farm if we ate rustic French peasant desserts.
Ingredients
1 tablespoon unsalted Butter
1 tablespoon Sugar
1/3 cup Sugar
3 extra-large eggs – room temperature
6 tablespoons unbleached all-purpose Flour
1 ½ cups Heavy Cream
2 teaspoons Pure Vanilla Extract
1 teaspoon grated Lemon zest
¼ teaspoon kosher salt
2 tablespoons Cognac
2 cups pitted Cherries
Confectioners’ Sugar
Preheat oven to 375 degrees. Butter 10 x 1 ½ - inch round baking dish or equivalent size oval baking dish, sprinkle dish with 1 tablespoon of granulated sugar.
Beat eggs and 1/3 cup of granulated sugar in bowl of an electric mixed with the paddle attachment until light and fluffy. On low speed mix in the flour, heavy cream, vanilla extract, lemon zest, salt and cognac. Set aside for 10 minutes.
Pit 2 cups of cherries. Evenly place cherries in baking dish. Pour batter over cherries and bake until the top is golden brown and the custard is set, 35 to 40 minutes. Serve warm or at room temperature, dusted with confectioners’ sugar.
Servers 8
The 10 minutes while the batter sits is a good time to pit the cherries. You have the time. You can either pit cherries or do a little kitchen cleaning? Your Choice. Also, cherries can be very messing in the pitting process.
Do not over cook. It should be somewhere between custard and a very moist cake a little closer to custard. Over cook and it will be the wrong texture, closer to rubber.
Monday, July 7, 2008
Champagne Cocktail Gift Basket
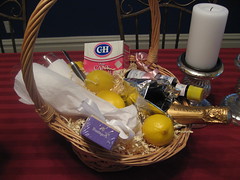
It was my friend Chuck’s birthday and I needed a gift. Chuck is hard to buy for. I know everyone is hard to buy for. But, Chuck has two interests: theater and opera. He has tickets to everywhere and owns every recording know to man. Chuck does like champagne and a champagne cocktail occasionally. So, I assembled this Champagne Cocktail Gift Basket. Regardless if the person makes the champagne cocktails at home, it is still a nice gift with the bottle of champagne, flutes, and zester. How much does a box of sugar cubes cost and bitters is always good to have on hand. Well, at least in my house.
Both, the items in the gift basket and cocktail recipe follow.
Components
1 Basket with assorted tissue paper and ribbons
1 bottle Champagne/Sparking Wine
1 bottle Angostura Bitters
1 box Sugar Cubes
Several Lemons
2 Champagne Flutes
Citrus Zester
Assorted basket stuffers such as chocolates, fruits, candy, whole nuts, etc
Decoratively arrange items in basket. Present.
Makes 1 Champagne Cocktail Gift Basket
Ingredients
1 Sugar Cube
2 dashes of Angostura Bitters
Champagne/Sparkling Wine – chilled
Lemon Twist
Place the sugar cube in a champagne flute; to the sugar cube add a few dashes of Angostura Bitters. Slowly add champagne/sparkling wine to the flute. Garnish with a lemon twist.
Makes 1 Champagne Cocktail
Some recipes call for adding brandy on top of the champagne.
Sunday, July 6, 2008
Caprese Salad Kabobs
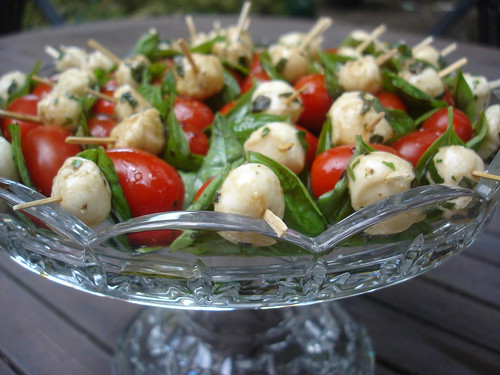
This bite-sized appetizer perfectly captures the wonderful flavors of a Caprese salad. It's simple, summery, & delicious - enjoy!
Update 11/23/2008: Food & Wine just published a recipe for "Margherita Skewers" using marinated bocconcini. Mmmm hmmm....I've been making these for years...
Ingredients
Small tomato (cherry-sized or smaller; grape work best)
Basil leaf
Marinated Mozzarella Bocconcini, or a chunk of fresh mozzarella
Olive oil
Salt & pepper
Toothpick
NOTE: I didn't give out quantities for the ingredients because this is such a simple recipe. Determine how many pieces you want to serve (allow up to 4 per person - really!) and that's how many tomatoes, bocconcini, basil leaves, and toothpicks you'll need.
Using a toothpick, spear the mozzarella, then one end of the basil leaf, then the tomato. Wrap the basil leaf around the tomato and spear the other end of the leaf. Arrange on a serving plate - I find that the shape lends itself well to overlapping circles, pictured above. Drizzle lightly with olive oil and season with salt & pepper to taste.
Marinated Mozzarella Bocconcini

According to Epicurious.com, bocconcini means "mouthful" in Italian. These bite-sized morsels of fresh mozzarella are delicious and their diminutive size makes them perfect for appetizers. I buy the plain ones packed in whey and marinate them myself with whatever fresh herbs I have on hand. They can be used in so many ways - thrown in a pasta salad, eaten plain, or used in an appetizer, like in a Caprese Salad Kabob.
If you can't find bocconcini, cut down a round of fresh mozzarella into small chunks. It's the flavors that are most important here, not the shape of the cheese!
Ingredients
16oz bocconcini
4 T chopped fresh herbs, including:
-Italian parsley
-basil
-chives
-oregano
1/4 cup olive oil
1 T white wine vinegar
1 t salt
1/4 t pepper
1/4 t red pepper flakes
Drain whey from bocconcini. In a medium bowl combine all ingredients and stir. Cover and refrigerate for at least 2 hours to allow flavors to develop, stirring occasionally.
Monday, June 30, 2008
Booze 'n Berries over Lemon Poppyseed Muffin

I'm a berry freak. It's genetically coded into my DNA, but it skipped a generation. Let me explain: Growing up, my grandfather had a u-pick strawberry patch. He loved it; my father, who (to hear him tell it) spent his entire childhood toiling in the berry patch under the hot Midwestern sun, most emphatically did not! Since I never had to work in a berry patch, I have only vivid and fond memories of my cousin Holly and I walking the rows and eating handfuls of sweet, warm, juicy strawberries right off the runner. To me, strawberry = summer.
I call this "Booze 'n Berries" because I kick up the flavors by adding in Cointreau and Creme de Cassis, two of my favorite liquors to use in desserts. This is a great topping for pound cake or ice cream, or in this case over a store-bought Lemon Poppyseed Muffin (if you can make your own, go for it; if not, don't sweat it and just by from the bakery!). You can make it with just strawberries, but I like to add in blueberries, raspberries, or blackberries (sometimes all 3!) depending on what looks good at the market. I love to make this because it's an easy, no fuss dessert that your guests will wipe clean off the plate!
Ingredients
1 qt strawberries, sliced thick & chunky
1 pint blueberries, raspberries, or blackberries
1/4 - 1/2 cup sugar, depending on ripeness (use less if the berries are already sweet)
1/2 lemon, zest & juice
1T balsamic vinegar
2 T Cointreau or Triple Sec
2 T Creme de Cassis
1 T mint, chiffonade
4 Lemon Poppyseed Muffins, sliced in half down the middle
Slice strawberries into a large bowl. Add in other berries, sugar, lemon, vinegar, liquors, and mint. Stir gently, so as not to mash the berries. Let the berries macerate (juice) and the flavors develop in the refrigerator, covered, for 30 minutes and up to 1 day. Serve on top of pound cake, ice cream, muffins, or heck just eat it plain with a spoon.
Friday, June 27, 2008
Grilled Shrimp Po' Boy
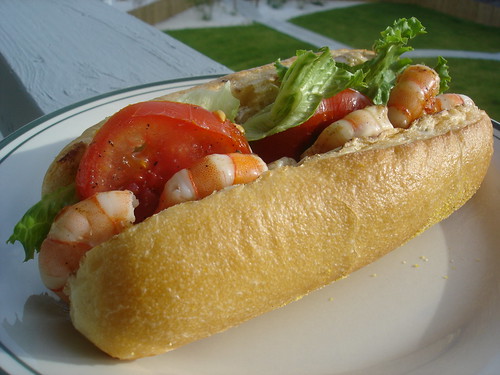
Day 5 at the beach. Made another trip to Joe Patti and picked up a pound of 26/30 count shrimp. Peeled and deveined them, grilled them brushed with melted butter, and served them on a hoagie with lettuce, tomato, and some Creole Mayo for a simple and delicious lighter take on a classic - a Grilled Shrimp Po' Boy.
Ingredients
4 hoagie buns
24-30 shrimp, peeled & deveined, heads and tails off
2 T butter, melted
1/2 lemon
Salt & pepper to taste
Lettuce
Tomatoes
Creole Mayo
Heat grill to high. Peel and devein shrimp, removing tails. Thread onto skewers and grill, covered, for 2 minutes, brushing with melted butter. Turn and brush other side with butter. Grill for 1-2 minutes more until shrimp are firm, pink, and opaque. Remove from grill. Squeeze fresh lemon juice over shrimp and serve immediately, 6 or so to a hoagie dressed with lettuce, tomato, and Creole Mayo.
Tuesday, June 24, 2008
Duo of Crabby Patties

Chris and I are in the midst of our annual vacation at Pensacola Beach, a low-key, relaxed beach community along the Gulf Coast in Florida's panhandle. It's heaven - beautiful white beaches and incredibly fresh seafood.
I was inspired to make crab cakes after watching Spongebob Squarepants. For those of you who aren't famliar with the cartoon (shame on you), Spongebob is a frycook at the Krusty Krab making crabby patties. I had crab cakes on the brain, so I made a trip to Joe Patti, Pensacola's famous fish market, to pick up jumbo lump crab meat.
I also watch reality cooking shows like Bravo's Top Chef. I've learned a bit about presentation from those shows, and have always liked how they do duos or trios or flights of things. I thought it would be fun to throw all of these ideas together into a Duo of Crabby Patties - two appetizer-portioned crab cakes on water rolls, one topped with a cucumber mango salsa, one with Creole mayo.
These turned out great, if I do say so myself, and are actually really easy to prepare. You'll get raves and won't ever break a sweat!
2 eggs
1/4 cup mayonnaise
1 T course ground mustard
1/2 lemon, juiced
2 scallions, chopped
2 T parsley, chopped
2 T dill, chopped
1 lb. jumbo lump crab meat, picked through for shells
1/2 cup Panko (substitute with breadcrumbs), plus extra for coating
Salt and pepper to taste
Butter & oil
8 water rolls or other small roll
Lightly beat eggs with whisk. Whisk in mayo, mustard, and lemon juice. Using a wooden spoon, stir in scallions, parsley, and dill. Add crab, Panko, and salt and pepper and gently fold with spoon, being careful not to break the crab into smaller pieces. Gather crab mixture into small palm-sized balls and gently pat into a small rounded patty. Dredge in additional Panko and place on wax-lined baking sheet. Refrigerate for 30 minutes.
Heat butter and oil in large skillet. Cook 4-6 crab cakes at a time, depending on the size of your pan. You want to have room between each cake for even cooking. Cook 4 minutes each side, then drain on paper towels.
Serve immediately with lettuce, tomato, and buns and top one each with Cucumber Mango Salsa and Creole Mayo.
Serves 8.
Cucumber Mango Salsa
Ingredients
1/2 English cucumber, seeded & cubed
1 mango, peeled & cubed
2 scallions, chopped
1/2 lemon, zest & juice
2 T cilantro, chopped
2 T parsley, chopped
1 T dill, chopped
2 T white wine or 1 T champagne vinegar
Salt & pepper to taste
Mix ingredients in bowl. Cover and refrigerate at least 30 minutes for flavors to develop. Keeps refrigerated up to 2 days.
Creole Mayo
Ingredients
1/4 cup mayonnaise
2 T Creole seasoning
1/2 lemon, juiced
Mix ingredients & store refrigerated up to 2 days.
1/4 cup mayonnaise
2 T Creole seasoning
1/2 lemon, juiced
Mix ingredients & store refrigerated up to 2 days.
Sunday, June 15, 2008
Lemongrass-infused Vodka
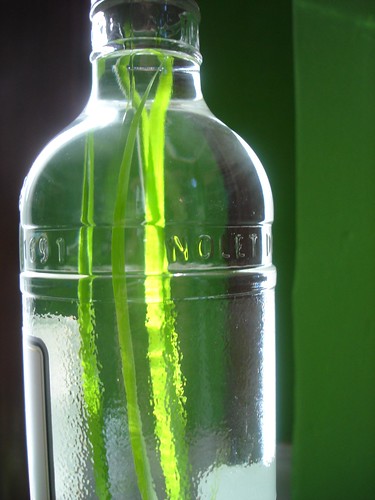
We've planted lemongrass in our herb garden for the past couple of years and I honestly don't know why. It's a great plant, with its grass-like stalks and lemony essence, but I've struggled with what to actually do with it.
St. Louis has numerous authentic, delicious, and inexpensive (my holy trinity) Vietnamese & Thai restaurants, which is where many people get their first exposure to lemongrass. But because our local restaurants are so good & affordable there's little reason for me to make sub-par home versions spring rolls or Tom Yum soup, the dishes lemongrass usually turns up in.
Instead I decided to try infusing vodka with lemongrass. The young, tender sprigs are perfectly sized for a 750mL bottle of vodka. I've read different recipes that use the more woody stalk, but because this is early in the herb season I've only got the young shoots in my garden. I'll try using the stalks later and compare, but until then:
Ingredients
1 750mL bottle of good vodka (I like Ketel One or Grey Goose)
3 young stalks lemongrass
Wash & dry the lemongrass. Place in vodka. Store in a cool, dark place for 3 days and up to 1 week. Strain the vodka & return to its bottle.
Once this has steeped I'm going to try it in a variety of Thai- and Vietnamese-inspired 'tinis and 'tails - check back!
Monday, May 26, 2008
Southern Greens
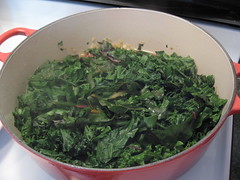
I liked greens when I was a kid growing up in the South. They were always part of the summer garden and dinner table; and always served with hot pepper sauce. My mother planted turnip, mustard, and kale and would occasional pick polk salad from fields around the farm. Greens are a very traditionally southern dish and not seen in the midwest or north.
I was at a birthday dinner party at Terrene and the side vegetable was a mixture of greens. They were very, very good and it took me back to my childhood. The trainer at the gym has also told me I need to eat more green, leafy vegetables. Although I’m not sure he meant with bacon. The picture is of a mixer of kale and swiss chard about a third of the way through the cooking process.
Ingredients
2 to 4 tablespoons Olive Oil
3 to 4 slices Bacon - diced
½ Onion - diced
4 large bunches of Greens – Kale, Mustard, Turnip, Collard, or Swiss Chard
2 cups Water or Chicken Broth
½ to 1 teaspoon Salt
½ to 1 teaspoon freshly ground Pepper
½ to 1 teaspoon Sugar
Wash greens thoroughly, remove stems and ribs, and roughly chop. In a larger stock pot or dutch oven add olive oil and fry diced bacon until fully cooked. Add onion to bacon renderings and sauté until soft and translucent. On mid-high heat add greens to oil and bacon and allow to wilt slightly. Add water or chicken broth, salt, pepper, and sugar to taste. Lower heat, cover and simmer for 1 to 2 hours until tender.
Sever with hot pepper vinegar. Servers 6 to 8.
I like to mix and match the different types of greens, usually kale with one of the others. Use ½ of one type and ½ of another. If you are really adventurous and can find it, try with Polk Salad. Tougher greens like swiss chard will take longer to cook. Also, if you are using greens from your garden they will be much more tender then those purchased at the market. They will cook faster and you may not have to remover the stems and center ribs.
Subscribe to:
Posts (Atom)