
I love nachos. They are one of my favorite foods. Whether as cheese dip, individual single layer chips, or piled high; they’re all good. I also love to grill. So, why not put the two together. Just assemble, heat on the grill, and dig in. These are a great outdoor party appetizer and everyone will rave and ask “why didn’t I think of this?”
Ingredients
1 ½ cups Tomatoes – diced
¾ cup Scallions, white and green parts – sliced
15 ounces Black Beans – rinsed and drained
2 cups finely shredded Sharp Cheddar Cheese
½ teaspoon Cayenne Pepper
½ teaspoon Ancho Chile Pepper
3 fresh Jalapeno Peppers - sliced
Assorted White, Yellow, and Blue Tortilla Chips
1 cup Sour Cream
Preheat outdoor grill to Medium heat.
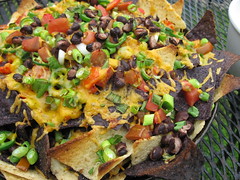
Combine the cheddar cheese, cayenne pepper, and ancho chile pepper in a small bowl and mix together. In a large cast iron skillet, 10 inches or larger, arrange a layer of assorted chips and top with 1/3 of each the tomatoes, scallions, black beans, cheddar cheese, and jalapeno peppers. Repeat with two more layers of chips and toppings. You may want to build a kind of “chip wall” around the outside edge of the skillet to keep toppings from tumbling off the sides.
Place skillet on grill and heat for 10 – 12 minutes with the lid closed.
Serve with sour cream. Makes 6 appetizer potions.
Feel free to adjust the heat with more or less cayenne and ancho chile pepper; more sliced jalapeno; or seeded jalapeno. Pickled jalapenos work just fine too. Don’t be worried if the outside edges of some of the chips get brown and burnt. It just adds to the flavor and experience of Skillet Nachos.
2 comments:
Skillet Nachos ROCK!
Some printers have print beds manufactured from supplies that prints adhere to extraordinarily well—and judging from our expertise, possibly slightly too properly. Adjusting print temperatures and some different settings may help forestall sticking, however such tweaks aren’t at all Direct CNC times enough. Many printers now include removable, flexible print beds; in case your printer has one, take away the mattress and thoroughly bend it to launch your model. If the print continues to be stuck, warmth the mattress again up to as} its printing temperature and see if the model pops off simpler. Next, use a scraper to carefully unstick the perimeters of the print and then transfer in a sawing motion toward the center. If you’re nonetheless stumped, one final trick is to take away the print mattress and stick it within the freezer for an hour.
Post a Comment