Saturday, September 12, 2009

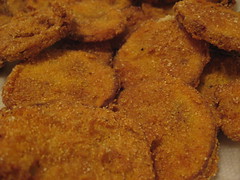
Fried Squash


Fried Squash
Originally uploaded by TagDragon

I’m on a little bit of a fried kick, which is fine with me. My friend Christine, who is an excellent cook, seems to think I eat too much brown food? I really didn’t understand what she was saying though? Fried Squash is another classic summer southern food. Fresh out of the garden, golden brown, and delicious.

Ingredients
2 or 3 large Yellow Squash
1 cup All-Purpose Flour
1 cup Cornmeal
2 teaspoons Salt
1 teaspoon fresh ground Black Pepper
1 cup Buttermilk – shaken
Vegetable Oil

Fill FryDaddy with oil to recommended level and heat oil.
Or fill Dutch oven with about 2 inches of oil and heat to 360 degrees F.
Or add ½ inch of oil to a large skillet and heat till very hot.

Combine flour, cornmeal, salt, and pepper in a shallow bowl or dish.

Wash squash, trim ends, and slice into ¼ inch thick rounds. There is no need to peel the squash. It is perfectly alright to use the entire squash, large and small ends.

Dip squash rounds in buttermilk then dredge in flour mixture until evenly coated. It is fine to press on the flour mixture so more adheres to the squash. Gently drop squash in hot oil. Do not over crowd the squash. For a skillet, fry in a single layer. May want to fry in batches. Carefully flip squash after 3-4 minutes to fry evenly. Fry squash for 6-8 minutes until golden brown. With a slotted spoon, remove squash from oil and drain on a plate lined with paper towels. Serve immediately.

Makes 5-6 servings

If your flour mixture starts to run out or clump together add more of the ingredients or make a fresh batch. You can reuse cooking oil for frying more than once. Allow the oil to cool. Strain the oil through a strainer lined with layers of cheesecloth or paper towel. Store oil covered in a cool, dark place. Also, do not keep oil hot longer than necessary. Stop using oil when it gets a dark color, has a rancid smell or changes the taste of the food, or begins to smoke before heated to proper frying temperature.

Monday, September 7, 2009

Roasted Heirloom Tomato Bisque


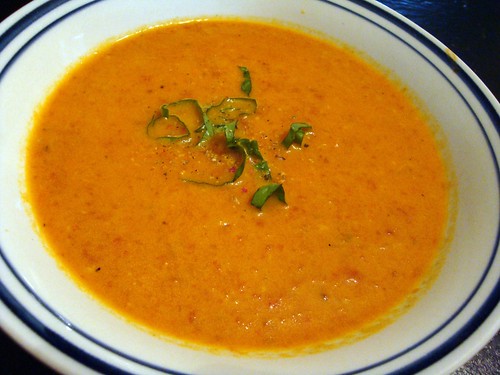
Here's another simple 'unrecipe.' I got some beautiful heirloom tomatoes at Soulard Market on Saturday and didn't want them to go to waste, so I sliced the tomatoes; sprinkled them with kosher salt, fresh ground pepper, thyme and olive oil; and roasted them in a 400 degree oven until they carmelized, about 45 minutes. Once those were finished I chopped & sautéed a leek, a carrot, and a celery stalk, a few cloves of garlic, and a little bit of poblano pepper until golden, about 10 minutes. I added the roasted tomatoes (and the cooking juices) to the pot and cooked until bubbling, about 5 minutes. I added in about 2 cups of chicken stock and brought the soup to a boil, dropped in a few sprigs of thyme & sage, and reduced to a simmer for about 20 minutes, stirring often. I let the soup cool a bit, then ran it through my new food mill (LOVE it!), then whisked in some cream until it looked about right, and seasoned with salt & pepper. Delicious & simple!

Wednesday, September 2, 2009

Fried Okra


Fried Okra
Originally uploaded by TagDragon

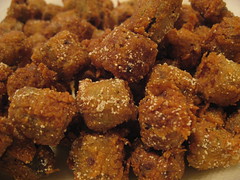
Being from the south, I love all things fried. And fired okra is very near the top of this list. I can recall (and still do) waiting for the okra to be ready and eating it right off the platter before it even reaches the table. And we love our FryDaddy which makes really good fried okra. One pound of okra makes 3 to 4 servings or it makes 1 if you’re me.

Fried Okra is also a nice appetizer. Serve it in the kitchen as folks are waiting on dinner. It’s so fun to nibble on, maybe with a little ranch dip. For fried okra in the winter when you can’t find good fresh okra see the freezing instructions at the end.


Ingredients
1 pound Fresh Okra
1 cup All-Purpose Flour
½ cup Cornmeal
1 tablespoon Salt
½ teaspoon fresh ground Black Pepper
¾ cup Buttermilk – shaken
Vegetable Oil

Fill FryDaddy with oil to recommended level and heat oil.
Or fill Dutch oven with about 2 inches of oil (best if okra can float) and heat to 350 degrees F.
Or add oil to a large heavy-bottomed skillet and heat to very hot. For both the Dutch oven and skillet do not fill over halfway full.

Wash okra whole, remove ends, and cut into ½ inch pieces. Okra will shrink slightly when frying. Place cut okra in a colander over a bowl and pour buttermilk over okra until thoroughly coated. Allow to sit for a minute or two.

Combine flour, cornmeal, salt, and pepper. Toss okra in flour mixture until thoroughly coated. Gently place okra in hot oil. Do not over crowd the okra in the oil. No more then two pieces deep. May want to fry in batches. Do not stir or turn the okra for 4-5 minutes. Carefully turn okra after 4-5 minutes to fry evenly. Fry okra for 8-10 minutes until deep golden brown. With a slotted spoon, remove okra from oil and transfer to a plate lined with paper towels. Serve immediately.

Makes 3-4 servings


If your flour mixture starts to run out or clump together add more of the ingredients or make a fresh batch. You will be able to fry two batches before serving. I recommend using the FryDaddy and then the Dutch oven.

Freezing Instructions:
Follow instructions up until frying. Place the flour mixture coated okra onto a parchment lined baking sheet in a single layer and freeze. After frozen, transfer okra to a freezer bag and keep frozen until ready to use. Fry frozen okra as directed above.

Monday, August 24, 2009

Tapenade with Feta


Tapenade with Feta
Originally uploaded by TagDragon


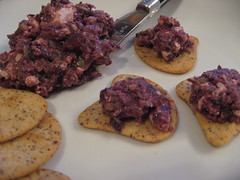
I’m a big fan of tapenade. As you can see from here. Following is another variation on the traditional tapenade. I think olives and feta are a natural combination and work great together. They both remind me of Greece, even though they are found in many other cultures and types of cuisines. The white flecks of feta are a nice contrast to the dark color of the olives.


Ingredients
½ pound Kalamata or other good black olives – pitted
¼ pound good green olives – pitted*
1 tablespoon Capers - drained
2 cloves Garlic - minced
2/3 cup good Extra-Virgin Olive Oil
2 tablespoons Lemon Juice – freshly squeezed (about 1 small lemon)
2 teaspoons fresh Thyme - chopped
2 teaspoons fresh Oregano – chopped
8 ounces Feta (whole block if you can find it)*
Crackers or toasted sliced Baguette

In a food processor fitted with the steel blade pulse the garlic a few times to thoroughly mince. Add both types of olives and capers and pulse a few times more until very roughly chopped. Add the olive oil, lemon juice, thyme and oregano and process until just combined but still chunky. If you have a whole block of feta, cut feta into small cubes. Add feta to the food processor and pulse a few times more. You want to still be able to see small chucks of the feta in the tapenade.

Serve with crackers or toasted baguette. Makes a large party potion.


*If your market has an olive bar, check to see if it has a Mixed Olive with Feta Salad. Use ¾ pound of the olive feta salad (very heavy on the feta and heavy on the green olives) in place of the ¼ pound green olives and 8 ounces feta. Any oil that comes along with the olive feta salad, use with the extra-virgin olive oil in the tapenade.

I recommend cutting each olive in half before adding them to the food processor to check for missed olive pits. I find one or two pits about every time I buy olives. Also, see the crostini blog post that goes excellently with tapenade.

Saturday, August 1, 2009

Trio of Sour Cream


Trio of Sour Cream
Originally uploaded by TagDragon


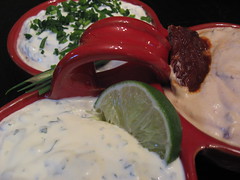
I like flights of food and drink where you get multiple small portions of the same item in different flavors. While this trio of sour cream is not a true flight, it is along the same idea. It is a great way to zest up sour cream and if you want to make something a little extra special. Varity is the spice of life. Goes great with Skillet Nachos.


Ingredients

Cilantro Lime Sour Cream
1 cup Sour Cream
2 tablespoons fresh Cilantro – finely chopped
1 tablespoon fresh Lime Juice

Combine all ingredients and thoroughly whisk together. Refrigerate until ready to use. Garnish before serving.


Chipotle Sour Cream
1 cup Sour Cream
2 tablespoons Chipotle Peppers – seeded and finely chopped (2 peppers)
2 tablespoons Adobo Sauce from can

Combine all ingredients and thoroughly whisk together. Refrigerate until ready to use. Garnish before serving. Find Chipotle Pepper in Adobo Sauce in the Mexican food isle.


Herb Sour Cream
1 cup Sour Cream
2 tablespoons fresh Parsley – finely chopped
2 tablespoons fresh Chives – finely chopped
½ teaspoon Salt
¼ teaspoon fresh ground Pepper

Combine all ingredients and thoroughly whisk together. Refrigerate until ready to use. Garnish before serving.


When serving all three sour creams at the same time, garnish each to help people know which is which. Suggestions: a lime wheel on the Cilantro Lime, a whole chipotle pepper on the Chipotle, and chopped chives sprinkled on the Herb.


Sunday, July 26, 2009

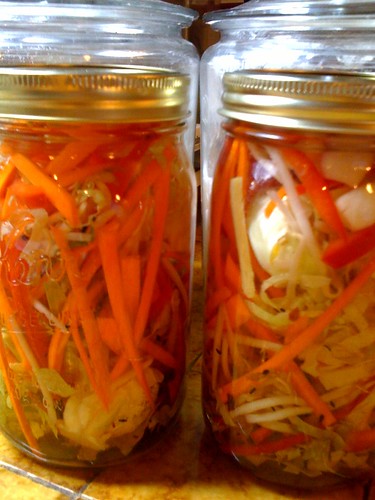
Farmstand Asian Slaw


Farmstand Asian Slaw, originally uploaded by chrisfreeland2002.

I was inspired to make this slaw after reading this article in Food & Wine about quick pickles. I like to make pickles & relish, but generally process them in a waterbath; these are faster to make, but more perishable.

The beauty of making relishes like this is you can throw in whatever you have on hand or looks good at the market and then find the appropriate seasoning to mix with the veggies. At the Tower Grove Farmers' Market on Saturday I found really crisp cabbage sprouts, bean sprouts, carrots & red peppers, so I started thinking about an Asian slaw, plus I knew I had garlic, ginger & rice vinegar on hand.

Talk about simple - I washed & chopped all the vegetables into thin strips and placed them in 2 qt jars, and topped them with the Curry Quick Pickles brine recipe. This should keep for a month in the fridge. I tried it out this morning and the flavors are already there - tangy, sweet, salty, & peppery with a satisfying crunch from the fresh veggies.

A more zingy title for this might be "Country Kimchi" but since it doesn't have fermented cabbage it's not reeeeeally kimchi, so I didn't want to offend any purists.

Chris

Friday, July 17, 2009

Skillet Nachos


Skillet Nachos
Originally uploaded by TagDragon

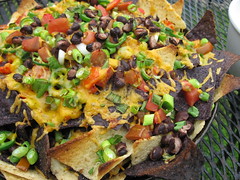
I love nachos. They are one of my favorite foods. Whether as cheese dip, individual single layer chips, or piled high; they’re all good. I also love to grill. So, why not put the two together. Just assemble, heat on the grill, and dig in. These are a great outdoor party appetizer and everyone will rave and ask “why didn’t I think of this?”


Ingredients
1 ½ cups Tomatoes – diced
¾ cup Scallions, white and green parts – sliced
15 ounces Black Beans – rinsed and drained
2 cups finely shredded Sharp Cheddar Cheese
½ teaspoon Cayenne Pepper
½ teaspoon Ancho Chile Pepper
3 fresh Jalapeno Peppers - sliced
Assorted White, Yellow, and Blue Tortilla Chips
1 cup Sour Cream

Preheat outdoor grill to Medium heat.

Combine the cheddar cheese, cayenne pepper, and ancho chile pepper in a small bowl and mix together. In a large cast iron skillet, 10 inches or larger, arrange a layer of assorted chips and top with 1/3 of each the tomatoes, scallions, black beans, cheddar cheese, and jalapeno peppers. Repeat with two more layers of chips and toppings. You may want to build a kind of “chip wall” around the outside edge of the skillet to keep toppings from tumbling off the sides.

Place skillet on grill and heat for 10 – 12 minutes with the lid closed.

Serve with sour cream. Makes 6 appetizer potions.


Feel free to adjust the heat with more or less cayenne and ancho chile pepper; more sliced jalapeno; or seeded jalapeno. Pickled jalapenos work just fine too. Don’t be worried if the outside edges of some of the chips get brown and burnt. It just adds to the flavor and experience of Skillet Nachos.